")


Today, I would love to talk about Tailwind Tribes an amazing feature of my favorite Pinterest scheduler. I use Tailwind every single day to grow my Pinterest account and hence my Blog traffic. I have been raving about their product a lot and today I wanted to make a deep dive into one of Tailwind’s best features, Tailwind Tribes.
Tribes are an additional feature where you can add pins to a Tribe you are part of. A tribe is a collection of pins from all members of that Tribe. Then the other members can look inside this collection of pins to find relevant content for their boards and repin them. You return the favor to other Tribe members by sharing their pins in return.
Each pin posted to a Tribe is displayed by the number of shares on Pinterest but also how many people already re-pinned this pin within this Tribe. It’s amazing to find content which is relevant to your blogging niche but also performs and resonates well with other pinners and users.
Let’s dig in deeper and I am going to show you my exact system of using Tailwind Tribes to improve my Pinterest account and hence improve my Blog traffic.
By using my link to get Tailwind Tribes you get $30 account credit when you upgrade to a paid plan!
What is Tailwind?
If you haven’t heard me talk about Tailwind before here is a quick reminder of what Tailwind is and how it has helped me grow my Blog.
Tailwind is a program you can use to schedule your Pinterest pins in advance. Pinning consistently is a big factor in growing your Pinterest account and reaching a bigger audience.
The process works like this: When someone clicks a pin, they are referred to your website. The better your Pinterest profile and pin performance the more people are led to your site.
So far so good. But how do you grow your Pinterest account?
This is exactly where Pinterest schedulers come in and in particular Tailwind my favorite one!
About every two weeks, I use Tailwind to schedule out 30-40 pins per day. Meaning I schedule hundreds of Pins out in one or two sessions. Tailwind creates a schedule around these pins and distributes them to my audience on Pinterest. Tailwind is Pinterest approved and they are allowed to access the platform and push out these automatic pins to my profile.
Consistency is a key part of being successful and Tailwind ensures that my Pinterest profile is growing and is providing my followers with new and relevant pins every single day.
If you need more help designing click-worthy pins, download your “Pin design Guide” for FREE below!

What are Tailwind Tribes?
But, wait we were talking about Tailwind Tribes right?
YES!
Tailwind Tribes are an additional feature Tailwind launched a while ago. As mentioned before, a tribe is a collection of pins from all members of such Tribe. You and other members can look inside this collection of pins and find relevant content for their boards and repin those pins.
You as a member can return the favor to other Tribe members and share their pins in return. Each pin posted to a Tribe is displayed by the number of shares on Pinterest but also how many people already re-pinned this pin within this Tribe.
As you can share any relevant pin to such a Tribe, it can give a huge boost to old pins of yours and revive them, but also give a starter boost to new Pins to go viral!
Here is what Tailwind says about Tailwind Tribes:
- Enables you to meet and grow with other marketers
- Helps you solve 2 Problems:
- Having a steady stream of high-quality content to share
- Getting your Pins seen and shared
- Add your content to a Tribe and have others view, schedule and share it to their audience.
- Because Tribes are created with a niche in mind, a Tribe ends up with a pool of content you know and can trust!
How to use Tailwind Tribes to explode your Blog Traffic
1. Set Up
If you are new to Tailwind start your Free Trial HERE!
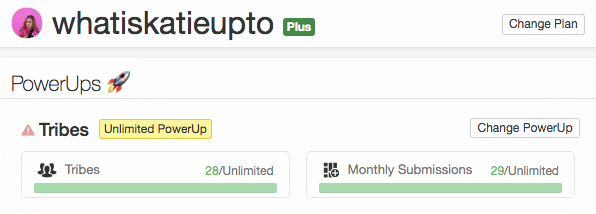
With your normal subscription (I am using the Plus Plan for $9.99/month) you have
- 5 Tailwind Tribes Memberships
- 30 Monthly Tribe Submissions
included. I also have a “Power Up” which allows me to get unlimited access to all Tribes, as well as unlimited Tribe submission”.
But listen, you don’t need this in the beginning! Don’t stress about it!
Go with the Plus Plan for your subscription and test out Tailwind Tribes and the 5 Memberships and 30 submissions you get. You can always upgrade later if you have figured out how it works and you can see that it makes a difference.
Start your Free Tailwind Trial HERE!
2. Finding relevant Tribes
Step 1: Navigate to the Tribes section in the left Menu in Tailwind
Step 2: Click on “Find a Tribe”
Step 3: Type in a Keyword which is relevant to your Blog and Pinterest Profile
It’s super important that you take your time and look for Tribes which are relevant to your niche. You should only pin pins to a Tribe with the same subject. It does not make any sense to pin a recipe pin to a finance board. This is a waste of your time as other Tribe members won’t re-share your pin and you won’t find relevant Pin in that board as well. So take your time to find niche relevant boards.
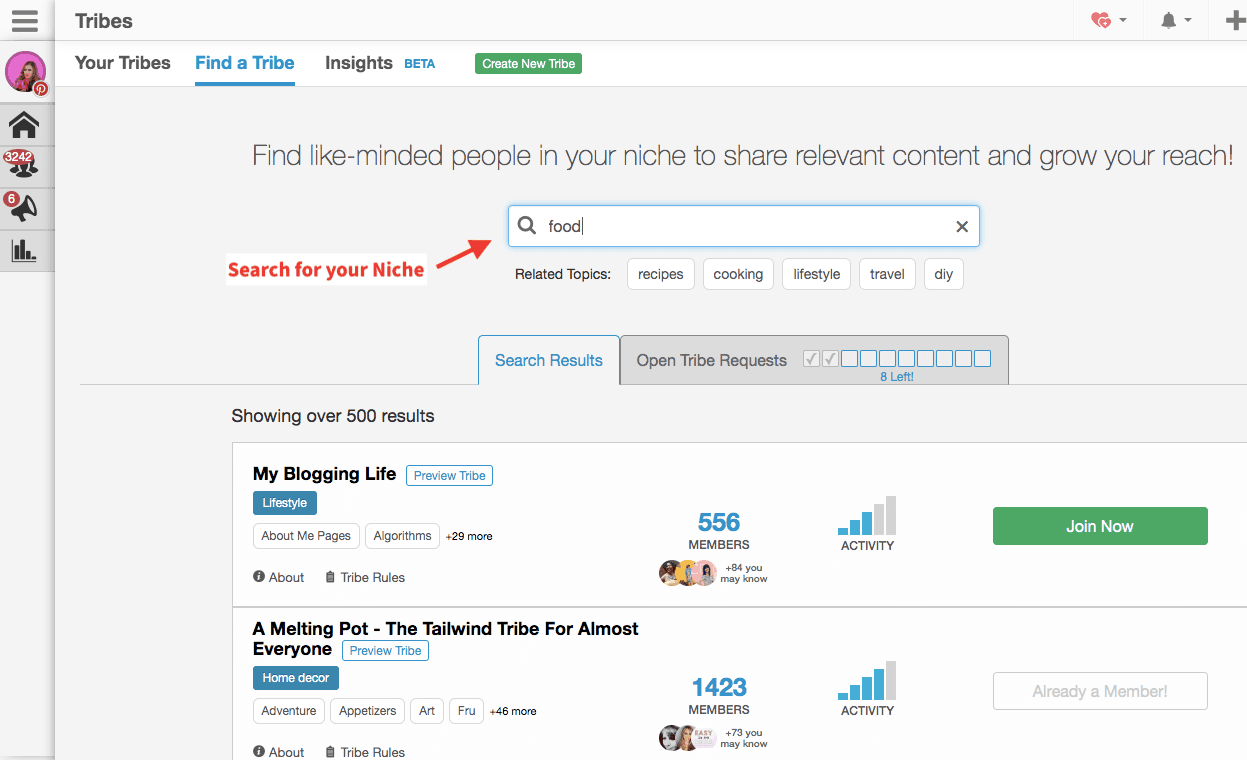
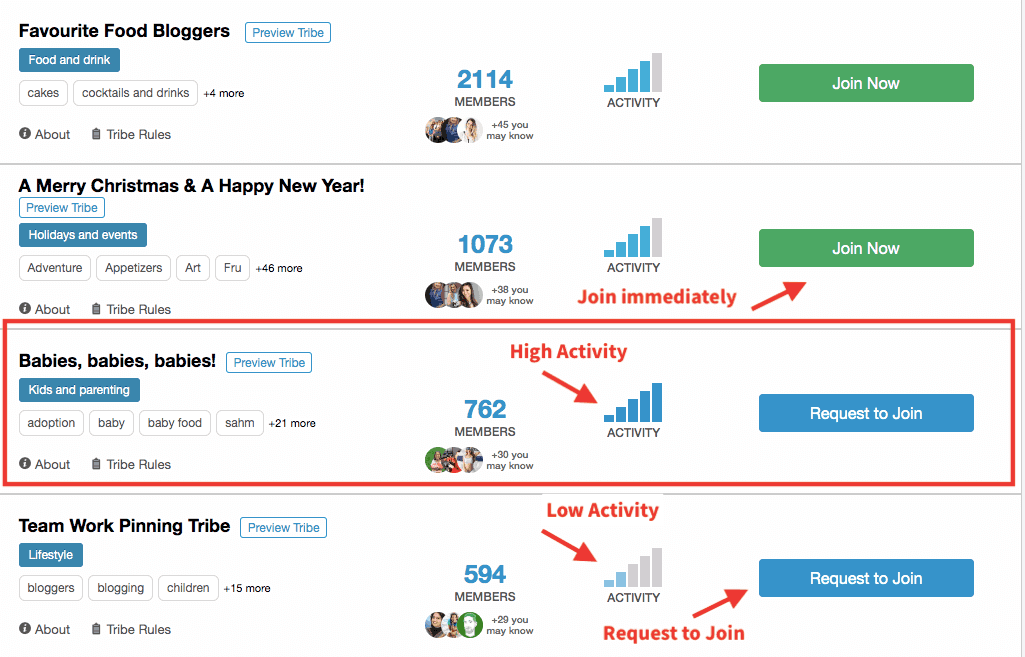
Step 4: Identify high-quality Tribes
Once you have typed in your keyword, look for Tribes with a high “Activity Level”. This actually means that the Tribe members are actively sharing other people pins and adding pins to that Tribe. You want a constant flow of new Pins you can share but also Members who are prone to sharing yours.
Some of the Tribes are free to join from the beginning, others you first have to request to access. Don’t get discouraged if you find a board which you first have to get approved too. Just follow the instructions displayed in the pop up which opens. It is usually pretty easy to get accepted. Just make sure you follow the Tribe rules.
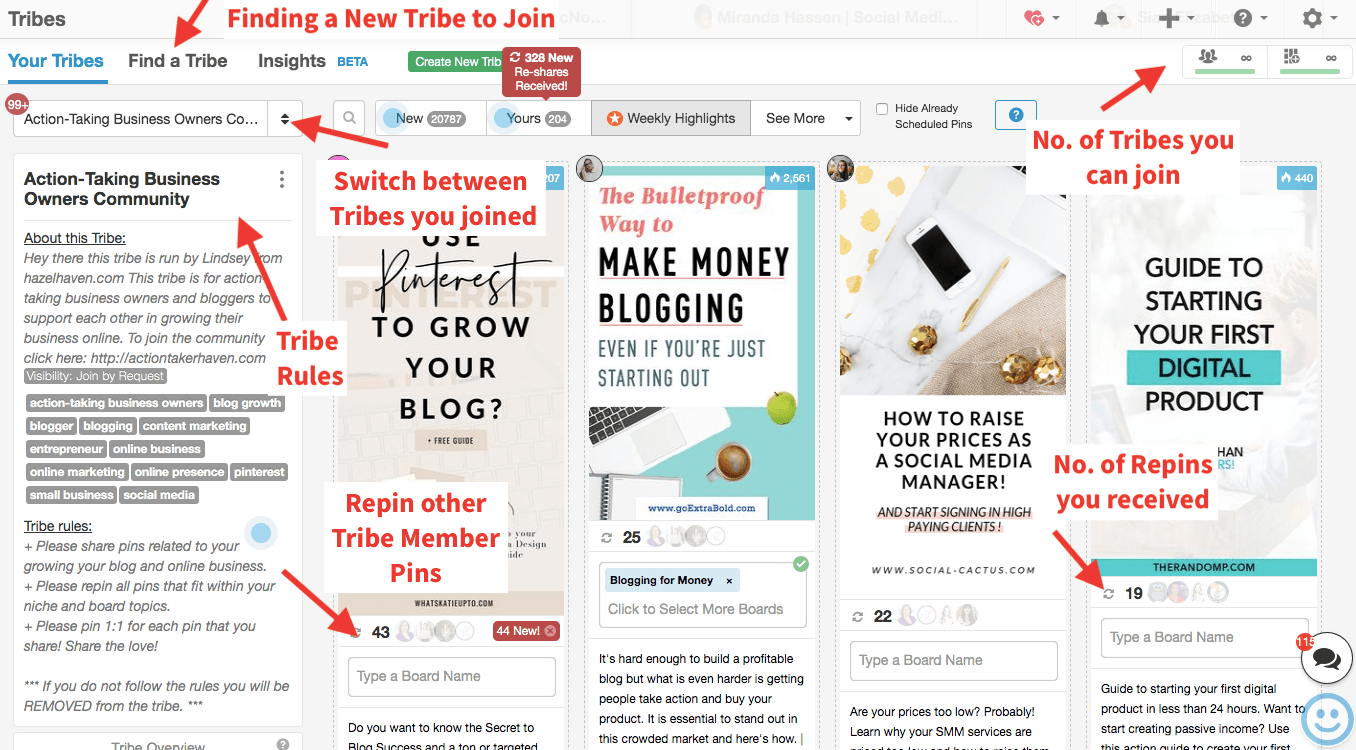
Once you are approved to a Tribe you can again navigate to your left Menu and press “Tribes”. You can now select the Tribe you want to share your pin to in the drop-down menu.
On the left side, you can now see all the information about this Tribe, such as how many of your pins were re-pinned, the rules of such Tribe and the Tribe Overview.
3. Adding Pins to Tribes
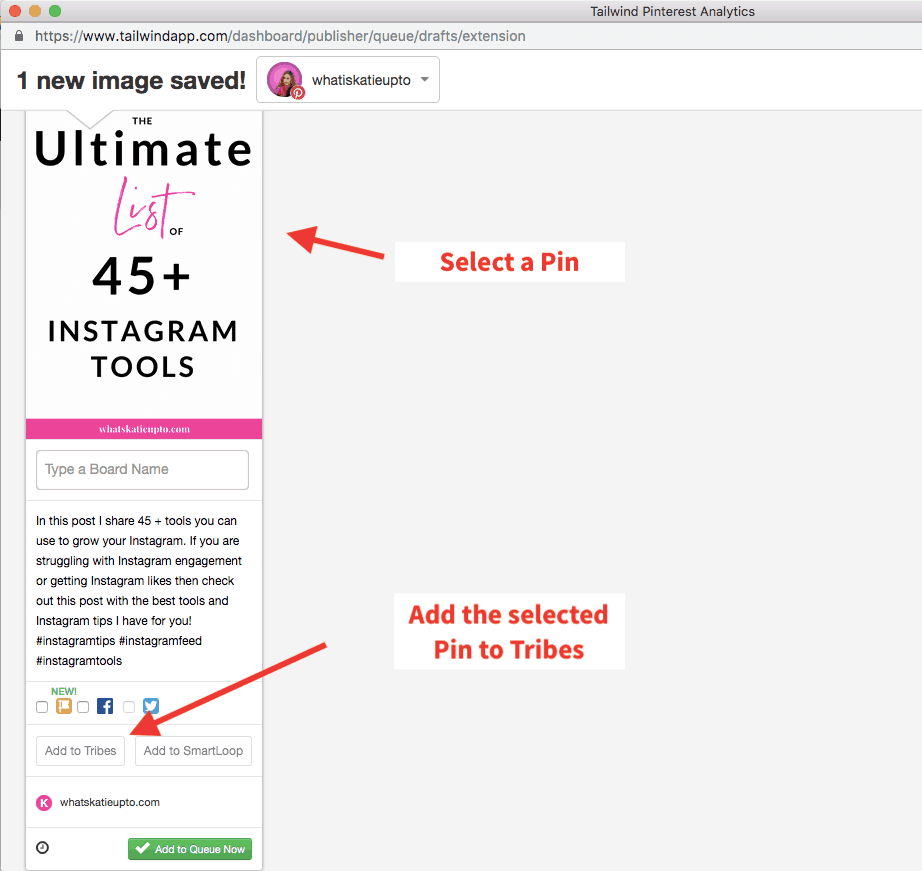
Step 1: Tailwind Chrome Extension
- Make sure you have the Tailwind Chrome Extension installed. This will let you pin any image you find on Pinterest, on a Blog or Website to Tailwind and your Tailwind Tribe. Get your Tailwind Chrome Extension HERE!
Step 2 Head to your Pinterest Profile or Blog Post
- Now, that you are accepted to a Tailwind Tribe let’s add our first pin. Head to a blog post which contains a pin you would like to add or head to your Pinterest Profile.
- Press the little Tailwind extension sign in the corner of your pin you want to add.
- A pop-up window opens. Scroll down your pin and then press “Add to Tribes”
- Select the Tribe you want this pin to be added and press “Add to Tribe”
- That’s it!
4. Sharing other Members’ Pins
Most Tailwind Tribe rules want you to re-pin in a 1:1 ratio. Meaning for every pin you add you also have to repin someone else’s pin from this Tribe.
I would recommend you to take this seriously as the whole concept of Tribes relies on people to share each other’s stuff! Also, I am guessing that you are not able to fill your Tailwind schedule with fresh Pins from your Blog alone. Tribes are a great resource to fill your queue.
So go ahead and find relevant pins from other Tailwind Tribe members and add them to your queue.
To share other people’s pins head to a Tribe and then:
Step 1: Select your Tribe
Step 2: Find a relevant Pin with a good amount of re-shares on Pinterest (this is displayed by the blue flame) as well as re-pins in that Tribe. This way you are making sure that you are sharing high-quality pins which will help you grow your authority on Pinterest.
Step 3: Select a relevant Board. Always share the pin to your most relevant board first.
Step 4: Press “Add to Queue”
Step 5: Navigate to “Publisher” < “Scheduled Pins” in the left menu to check if your re-pin from the Tailwind Tribe was successfully added to your queue.
That’s it, you did it!
Let me know in the comments if you have a question about Tailwind Tribes and I can get back to you asap!
Would love to hear your thoughts on the post and how you are using Tailwind and Pinterest to grow your Blog.
Xx Katie
Ps. Don’t forget by using my link to get Tailwind Tribes you get $30 account credit when you upgrade to a paid plan!
If you need more help designing click-worthy pins, download your “Pin design Guide” for FREE below!
Disclosure: *If you purchase a product or service with the links that I provide I may receive a small commission. There is no additional charge to you! *