
")


Today I want t walk you through exactly “How to Write a Blog Posts.”
I get tons of questions about this, and I wanna give you all the juicy details.
So, writing blog posts is really the core of what you do as a blogger.
And I’ve got over 130 blog posts on my blog, and I’ve been blogging for almost 10 years, so there’re so many things I wish I knew when I started.
So today, I’m giving away exactly what I do from beginning to end when I write a blog post.
Inside your blog post, you can teach people, inspire them with your idea, or sell something, a product, or a service.
And you can apply my process of writing blog posts to different types of content.
I’m doing the same thing when I’m planning for a YT video, or maybe you want to create a podcast.
It works for both.
Now, to make it easy for you and so I don’t lose my head in all the details, I’ve structured this video into three parts.
What you should do…
- … Before You Start Writing
- How to Write a Blog Post
- … Before + After You Hit Publish
So let’s do this.

Step 1: Before You Start
So before you jump in and start writing your blog post, there’re a couple of things you can do to create the best content, use your time efficiently, and create content with purpose.
1. Choose a Type of Content
So for step 1 (before you start writing a blog post), you need to decide what type of content you’re going to create.
If you want to use your blog for business or to grow on social media, then you’re not writing for yourself; you’re writing for your audience.
And there are a couple of types of content that, in my opinion, work the best to do that.
So my favorite types of posts to connect with your audience are:
- “How To” posts
- “List” posts
- “Reviews”
a. “How To” Posts
So, first, why “How To” posts.
“How To” posts are usually in-depth tutorials where you’re being specific about a problem your audience has, and you’re trying to solve that problem for them.
It can also be a walkthrough of a tool or a story of how you overcame a roadblock or something.
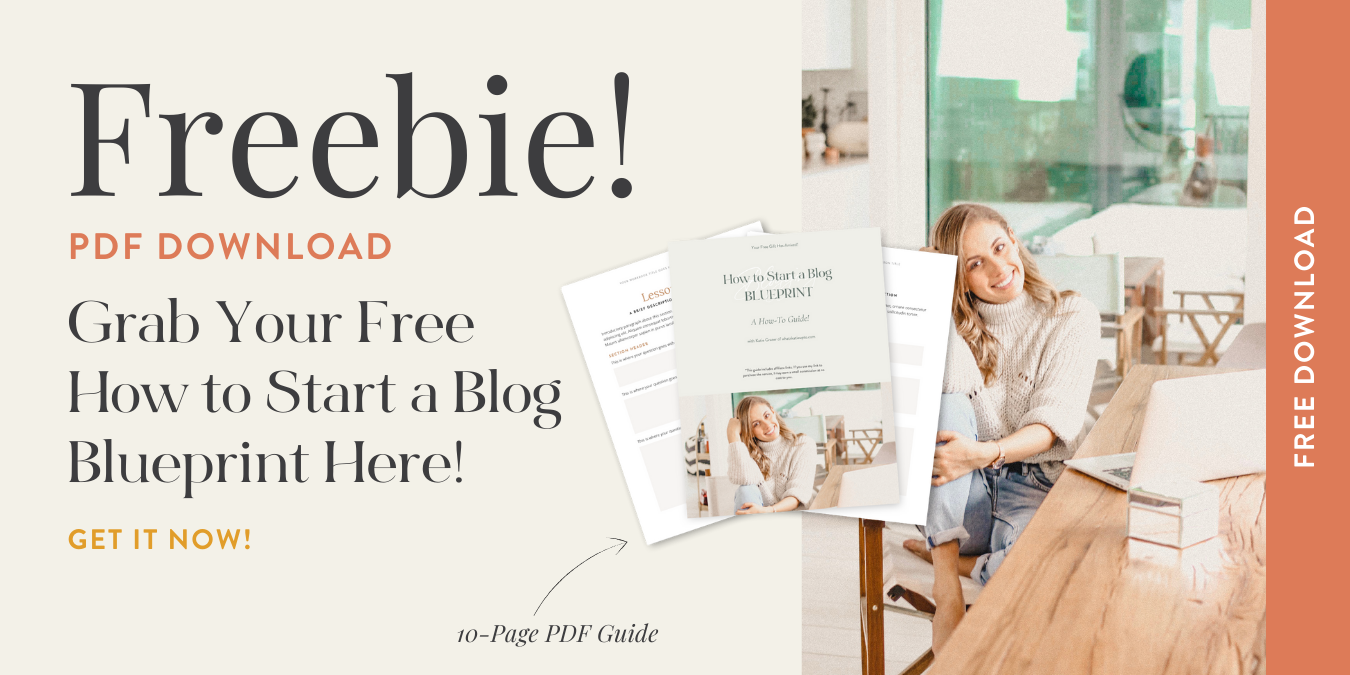
(If you want a really in-depth example of this, check out my how to start a blog tutorial here. Or grab my free Start a Blog Guide below!)
The purpose of your “How To” post is to educate your audience!
We always want a reason why we’re writing a blog post.
Otherwise, you’re just creating random things.
And believe me, that’s a waste of your time.
It’s ok to spend a bit more time before you start writing if that means you’re creating content with a purpose.
b. “List” Posts
Ok, second, we have “List” posts.
Usually, people love list posts because they are more actionable.
So, for example, “The 10 things you need to do YYZ”, or “Your 7 favorites things for spring,” or “The 5 must-do steps to whatever”.
Lists help break down the complexity of a topic, and it feels like the thing has just become more doable.
Like I can handle the 5 steps to growing a vegetable garden. You can do basically anything if it has 5 steps, and you can count it on one hand, right!.
List posts also don’t’ always have to be so in-depth as “How-To” posts.
So something like “The 10 must-have spring outfits of 2022” can be put together much more quickly than a super long 4000-word tutorial.
Now, the purpose of your “List” post is to inspire or educate your audience.
(Psst. Have you been enjoying this post so far? Make sure to save it to your Pinterest account for later)
c. “Reviews”:
And third, I love to write “Reviews.”
Reviews can be, for example, product reviews, trend reviews, or sharing a personal experience.
Maybe you’ve done a challenge and are taking your audience with you.
So, for example, “The good and the bad,” “What worked – What didn’t work,” or “Ehe pros and Cons.”
Stuff like that.
Reviews are also great for affiliate marketing.
So if you’re using a specific tool in your business that has helped you make a transformation you can show your audience exactly how the product helped you go from point a to point B.
And point B is that result that they really want.
Sharing affiliate products like this is so effective and, in my opinion, one of the best ways to start earning money from your blog.
So the purpose of your “Review” post is to promote a product or service to your audience.
2. Write an Outline
Ok, once I know what type of blog post I’m going to write, the second thing I do before I start writing is create an outline.
Yes, I do this every single time.
I’m not naturally a type-A kinda person.
(At all!)
I’m more like the creative type.
And while I’m writing, I get a million more ideas of what I could also say, write, or mention, and I get lost so quickly.
So writing an outline is seriously a must.
And this doesn’t have to be rocket science. So here’s what you can do:
- To start, write down everything that comes to your mind in a couple of bullet points. Just free your mind and bring everything to paper.
- Then dive in deeper – ask yourself: did you cover everything? Do you need to do additional research into something? Or think about if you need to leave something out. When you’re an expert, you can say so many things and go on forever, but this could make it difficult for a beginner to understand. So think about that too.
- And then, finally, you want to reorganize and structure. A great structure for “How To” posts is, for example:
- Start with the “What” it is your talking about
- Then continue with the “Why” it’s important to talk about this
- And then you can do the actual “How” to do this thing and full tutorial.
Step 2: How to Write a Blog Post
Ok, so, we’ve made it through our preparation.
Let’s move on to step 2, how to actually write a blog post.
So when it comes to writing your content, there’re three things involved:
- Writing your blog post
- Editing your post
- Adding “add-ons” (so any supporting elements like images, video, etc.)
1. Writing Your Blog Post
Ok, are you ready to start writing?
Now, when you’ve done your outline and research, this will be a piece of cake.
You just need to bring your thoughts to paper.
Now, I write all my posts in a Google doc first.
I’m not the biggest fan of the Gutenberg WordPress editor, so I write everything down in a Google doc.
This way, it’s also saved if something would ever happen to my blog.
I’ve got a folder for each blog post, where I have a doc for my outline and my content, and if I’m also doing a video, I can add that there too.
So everything is organized and in one place.
When I write, I use a tool called “Grammarly” to check my spelling.
I’m a native German speaker, so English is my second language. So naturally, I’m going to make mistakes.
(And I mean, many, many mistakes, lol).
But you know what, we’re not aiming for perfection here.
Grammarly will help you get rid of 95% of your mistakes,
And then the rest…well, it is what it is.
There will always be that person pointing out that one typo. But you know – it’s ok; I’m always assuming they mean well.
Now, getting your post done and moving on is way more important because there’s still a lot more to do.
So the final thing here is, I read everything out loud.
Maybe you’ve heard people talk about finding “your voice.”
I always find this a bit “whoo-whoo,” – what does this even mean!
But the way I make sure my post sounds actually like me…
Is to read it out loud.
I do this every single time.
And believe me, this will make all the difference.
Every blog post should sound like you’re talking to your best friend.
Reading your post out loud takes 5 minutes, but you’ll find those little spots where it doesn’t sound natural.
2. Editing:
Ok, when you’re done with writing, text editing is next.
Here are a couple of tips I want to give you that I’ve found to help people read through my posts more easily so they stay longer on my site.
So here we go.
Always make sure to:
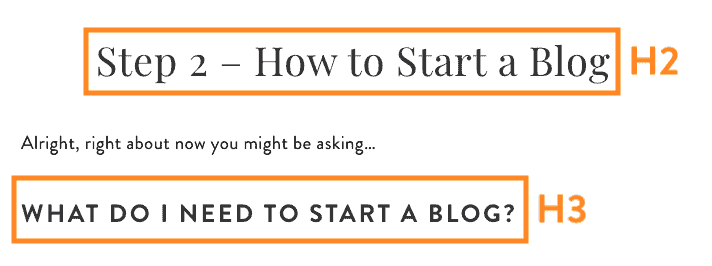
a. Use subtitles (H1, H2, H3)
Use subtitles.
In WordPress, there called headlines, so H1 is your headline 1, your main title. You should only use one H1 headline per blog post.
Then use the H2 headlines as your main titles to organize your post. And if you’ve created your outline, this is already done.
Then you can use H3 headlines if you want to structure it even further.
Literally, no one wants to read a 4000-word blog post in one stream of text.
It’s way too overwhelming.
b. Paragraphs:
Ok, now for my paragraphs.
I tend to do short paragraphs, usually one to two sentences.
You want to pull your reader through your content.
And I’m guilty of skimming through 80% of the other people’s stuff I’m reading online too.
But using strategic paragraphs helps people skim and actually read more of your content.
c. Bold, italic, highlighted fonts
And third, in editing, I always use different font styles to highlight certain things or draw attention to something.
You can use bold text or highlight important points you don’t want people to miss when they skim.
And then, you can also use the italic text function when you are commenting on something or giving behind-the-scenes, or you want to add fun like little text fragments.
All these editing techniques help people to get through to the end of your post.
3. Add-Ons: Supporting element:
And then, I do one more step before I move on to my promotion: And that is, I include my Add-Ons and any supporting elements.
So here I’m talking:
- Images
- Videos
- Links
a. Images:
So for blog post images, there are three things: Your photos, your graphics, and your featured image, aka your thumbnail.
Ok, so first, I want you to add your photos.
So this is either photos you took and edited yourself, so if you’re a food, DIY, home decor, style blogger, or any of that, this will be a big thing.
Or you can also add stock images that help support your content.
Stock images are taken by professional photographers, but they waived their rights to their copyright so you can use them on your blog.
Then second add any additional graphics.
Graphics can be, for example, infographics, stats, or your Pinterest pin image. Or images for a step-by-step guide, so people know, for example, where to click and what to do.
(Now I use Canva Pro to create all the graphics I need for my business. There’s also a free Canva version your can test out yourself. I use it every single day and it’s the best)
And finally, you’ll need to add your featured image (a.k.a. Your thumbnail)
So usually, on your website, you have your blog page, and there’s a feed of all the blog posts you’ve written.
And then, next to the blog post title, you’ve got your feature image, aka your thumbnail.
(Again, I use Canva Pro to create my thumbnails).
And that’s it for blog post images.
b. Videos
So second as another add-on, you can add a relevant video to your post if you have one.
This is only if you have a YouTube channel or if you want to add someone else video to your post because you think it’s relevant.
Videos can be great to break through your text, and sometimes people prefer to watch a video than read the text.
You can upload your video to your media library and then add it to your content.
But I always recommend you to start a YouTube channel
(and hear me out just for a second)
You can add your video as a private video to your channel.
Then you only add the video URL you get from YouTube to the blog post, and it will show up as a video on your post, the same way as when you would upload it directly to your media library.
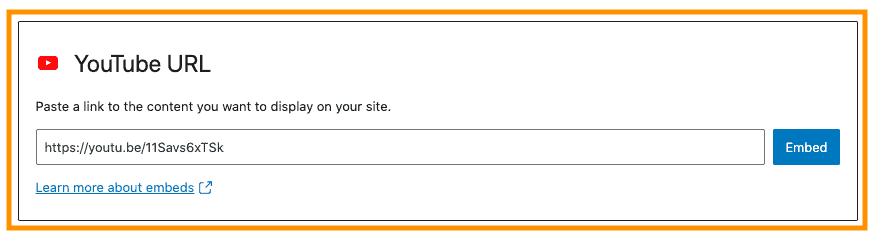
But, this way, the video is hosted on YT and not on your blog.
This is important because videos are huge files that take a long time to load.
So if you add a video straight to your blog post, it will take a long time to load, and people might not wait until it’s fully loaded but jump right off.
And you don’t have that issue if you host the video on YT.
You’re welcome 😉
c. Links
Ok, and finally, for our final add-on, you’ll need to add all the links.
First, add your “other website links.”
Maybe you’ve referenced something like a quote or a stat from another site. So make sure you also credit those other creators with that link to that resource.
Second, add your “related posts links.”
So, maybe you’ve written a blog post that would be helpful to read after this one.
Or you’ve got a deep dive into a topic you only brushed upon in this post you can also add that in with a link.
So something like another keto recipe, for example.
And you can do this straight inside your post right after you mention that topic – or you can add a list of related posts at the end of your blog post.
And finally, add your “affiliate links.”
As I mentioned before, affiliate marketing is a great way to make your first income from your blog.
So when you mention products and services you wanna make sure to add your affiliate link.
So that if the person ends up buying that product, you get tracked and paid that commission.
Step 3: Before & After You Hit Publish
Ok, that was a lot already, and you’re doing amazing.
Now, this is where most people stop.
They press publish and walk away.
But you and I are going the extra mile today.
Now, this is where people go wrong big time.
We’ve got a couple more things to do before we publish our post. And they are absolutely crucial for successful blogging.
So if you need to caffeinate before we move on – grab that coffee or diet coke or whatever’s your jam and come back here.
These are the things that are the difference between a hobby blogger and a 6 figure blogger!
So if you’re ready…
Let’s talk about what you need to do right before and after you hit publish on your post.
1. Add your Opt-In Form
Now, we’ve talked a lot about creating content with a purpose, right.
So educating your audience, or inspiring them but also promoting a product.
But another big purpose of your content is to attract people to your blog so they ultimately subscribe to your community.
And by subscribing to your blog – I mean joining your email list.
Your email list contains all your blog subscribers, including their email addresses, in one tool.
They need to give you their name and email address so you can start sending them emails.
And your email list is the No. 1 most important asset in your business.
No one can take away your email list.
Your email list belongs to you!
It’ doesn’t belong to Instagram, it doesn’t belong to Facebook, it doesn’t belong to Pinterest.
And here’s the most important thing about this.
Your email list is how you will make most of your money as a blogger.
And I know this is a shocker to many beginners.
But 100% true.
It’s true for me, and I know it’s ture for many of my blogger friends.
Email is still the No.1 way how to sell products and services to your followers.
So before you hit publish, you want to add your opt-in form to your post.
An opt-in form is a form that looks something like this;
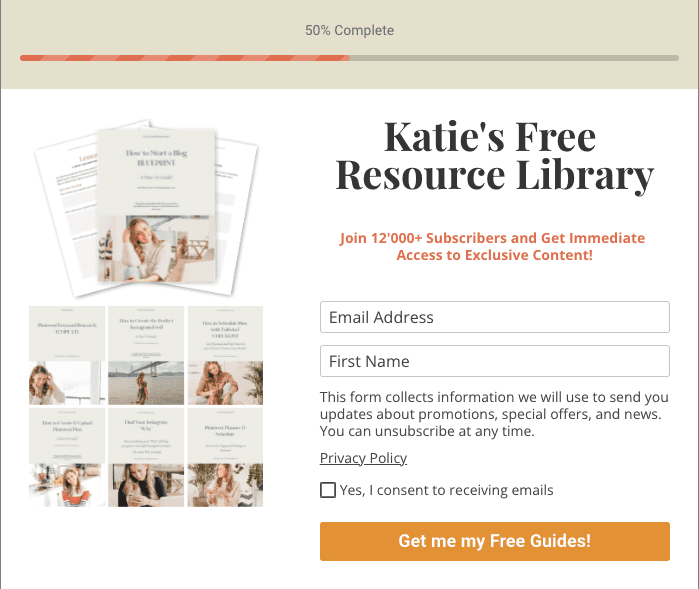
People can type in their name and email address.
When they click “join” or “subscribe,” they are added to your list, and you can start sending them emails.
And like I said, this is a separate tool from WordPress, and here I always recommend you use “ConvertKit.”
ConvertKit is my favorite email marketing service, and you can start a free account with them for up to 1000 subscribers.
It has all the functions that you need, like automations to send a welcome email and all that stuff.
So make sure you add your opt-in form to your new blog post before you publish.
2. Add a Pinterest Pin Image
Now second, and I’m probably going to bust another bubble here, but just because you publish a new blog post doesn’t mean people will show up and read it.
If you don’t promote the heck out of your posts, no one will show up.
And I’m not saying this to be mean.
You could have the best post in the world; if you’re not going to promote it on social and on Google, no one will even know you exist.
Now, if you’ve been following me for a while, you know that Pinterest is my favorite way of growing your blog traffic.
So here’s what I want you to do:
Before you publish your post, I’d love you to create a pin image you can share on Pinterest.
You can embed that pin like a regular image inside your post.
And then, when your post is live, you can use the Pinterest Chrome Extension or Tailwind to post or schedule that pin to Pinterest.
Once that pin is live on Pinterest, people can search a topic and find your pin, which leads them back to your post.
This is how people will find your post and your blog
If you need help designing your Pinterest pins, check out my very own Pinterest Pin Templates here.
My template pack includes 57 different pin templates you can use. I’ve designed them all myself, with the Pinterest best practices in mind so that you get the most clicks over to your site!
So check out my Templates by clicking here.

3. SEO using Yoast SEO Plugin
And then finally, our very last step in creating our absolutely killer blog post is to do your SEO.
Now don’t jump off – there are just a couple of things you can do to start without going all out with the Google craziness.
So I’d love for you to install a free plugin on your blog called the Yoast SEO plugin.
It’s free forever and will help your posts show up on Google.
When you’ve installed that plugin, and you go to the backend of your blog post, you now have this additional section at the end.
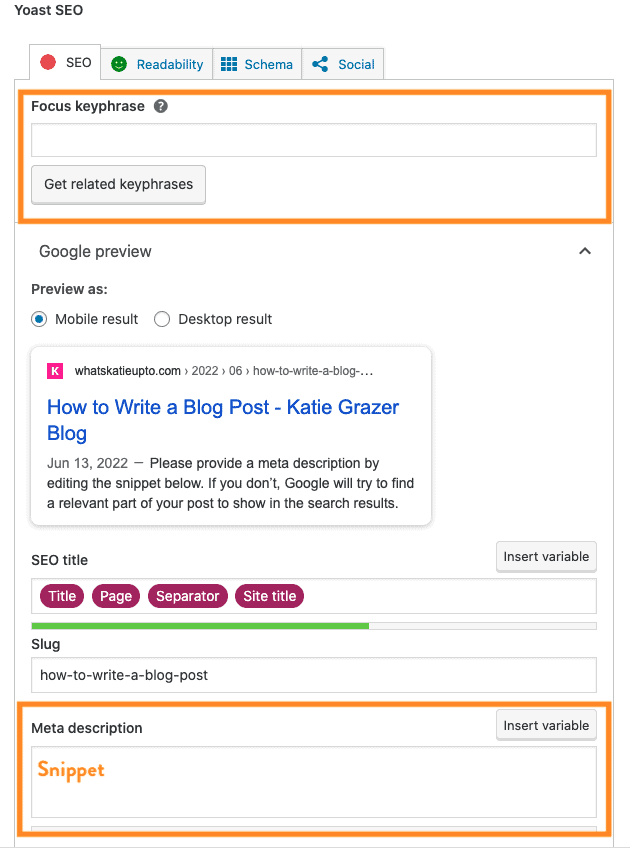
And here is where you can add a keyword and a snippet:
a. Keyword
So, first, I want you to define a keyword.
Each of your blog posts should have one main keyword.
And a keyword can be one word, but it can also be a short sentence.
A keyword is anything you type into a search engine like google to find something.
So when it comes to your blog post, use as a keyword you think people would type into Google when they are looking for a post just like yours.
This is usually part of your blog post title.
So anything with a “How to do XYZ” or “Ideas for yadi yadi ya.”
b. Snippet
And then, after you’ve defined your keyword, I want you to also add your snippet.
Now, if you go onto Google and look at the list of blog posts that show up you can see that below the title, there’s this little extract.
It’s just 1-2 sentences what the post is about.
Adding a snipped is so important for SEO and Google.
So make sure you fill that out and include your keyword.
It will help you rank and get even more people to your blog from Google.
And that’s wrap…!
This is exactly how I write my super high-quality blog posts people love but also help me convert people to subscribe and how they buy my products.
I know it was a lot, but you can come back to this video and watch certain parts again and again.
And just as a disclaimer here…
It’s normal that this process takes time.
Doing all these steps takes me a long time too!
So don’t listen to people telling you how they write their amazing posts in just one hour.
It’s BS or they’re just creating really poor quality posts.
I’m now giving you permission to create less if that means better quality.
So I really hope you’ve enjoyed this “How to Write a Blog Post” guide.
Let me know in the comments what you think!
And if there’s something you’d like to know more about when it comes to blogging and Pinterest.
No that’s it from me for today.
I love you so much and talk to you soon.
Tschüüüüs!
Disclosure: *If you purchase a product or service with the links that I provide I may receive a small commission. There is no additional charge to you! *


