When you upload an image to WordPress there are many Blog Image Descriptions you can input to describe your image and it can get super confusing. What does each of those fields mean and why and how should you fill them out?
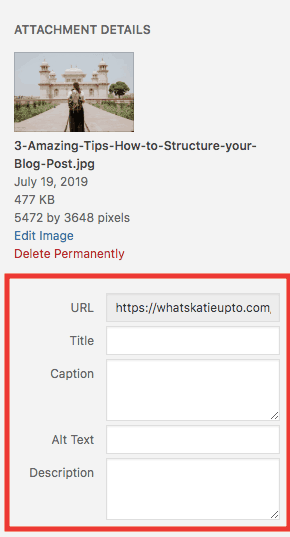
So, this is how it looks like when you have uploaded an image to WordPress and click it in your library. So, what is what my friends and why and for what do we need it? Let’s give you an overview of the different Blog Image Descriptions:
Ps. you want to Start and Grow a Blog that Makes Money FAST! You’re in luck. My signature blogging course, THE BLOG STUDIO, IS OPEN for enrollment for just a few days! Don’t miss it. You don’t have to do this alone. Let me help you get to your creative online business faster. Check it out now!

1. Image URL
The image URL is similar to a normal URL of a blog post, so the image URL will lead you to where your image is stored on WordPress. Sometimes when you will use Plugins or other things you may be asked to provide the image URL – then just copy-paste this into the requested field and it will appear – but for now, this is just good to know for you, my friends.
Also, the end of this URL will be made up of the image name you created before you uploaded the image. So again, it would make sense if the image name included a keyword for your post.
2. Image Title
The title allows you to provide a title to your image. However, as opposed to the name you gave your image as you saved it on your computer, this title is used internally by WordPress only. It’s to sort images in the media library.
It is not the title that search engines will be able to pick up! What Google pics up is the title you gave your image before you uploaded it, so you see it’s really important to do this in advance!
3. Image Caption
A caption is an image description that will appear with the image when you insert it into your post. This might be great if you are creating a gallery or maybe you want to display a product name!
You can also include links here which are great when you are for example a fashion blogger and you want to sell for instance the dress in the picture – you can include an affiliate link in the description!
4. Image Alt Text
Alt text gives you an additional option to optimize your image and post for search engines. Search engines use the tiltle.png (the title you gave your image when you saved it on your computer) but most and foremost the alt text as ranking factors in their image search results.
You should always include the title and 3 keywords here. Separate your keywords with commas and please remember don’t overdo it here as it is similar to the blog post text adding too many keywords – Google will see you as a keyword stuffer and you could even harm your Search Engine Optimization (SEO)!
Ideally, you should include keywords in the description such as the title. Also, Alt text is cut off at 125 characters so no one will be able to see it if you go overboard!
To sum it up, your image ALT text should, in any case, be: descriptive, brief and including Keywords.
5. Description
If you add text to the description field – your image will show up in the attachment post of your blog. Now, this is basically an additional site on your blog where people could visit and see the image they clicked on and the additional text that you put in. It is like the story behind a photograph, how you took the picture or anything else that you want to share.
Now personally, I do not use this on my blog but it’s up to you to decide whether this would make sense for you or not.
I hope this has de-hazed the crystal ball on Blog Image Descriptions for you and if you have any questions let me know in the comments, I love to hear from you!
xoxo Katie
?? Is this post useful and inspiring? Save THIS PIN to your Blogging Board on Pinterest! Thank you ?
