How to create a Blog on Bluehost
 Today, you are going to learn how to create your own amazing WordPress blog. Personally, I have been blogging for over 8 years and it allows me to combine my passion and job in one! I know that Blogging can be daunting and many of you are afraid of all the back-end work (coding, plugins etc.) that goes into creating a successful blog. However, with Bluehost, you can get started within minutes following the below described simple step. Let’s take it from there and gradually work ourselves towards building a successful blog and business. Now let’s learn how to create a blog! Click here to create your Blog for WordPress with Bluehost, then use the tutorial below to jump-start your Blog career!
First here are my thoughts on why you should choose Bluehost rather than a free or alternative provider.
- First of all, you can literally set up your Blog with only a few clicks watch my step by step guide video below)! The setup is so simple you don’t need to worry about wandering through a complex website, Bluehost guides you through every step, simply and easily.
- Bluehost does not only include a hosting service (basically think of it as where your Blog is saved. Like when you save a program on your computer you need someone to save, maintain -> host, your Blog), but it also includes a Domain Name. A domain name is your websites Name/URL. So for me, that would be whatskatieupto.com. To receive such a domain name you normally would have to buy it at a separate website and then link that to your hosting service provider (two separate services). With Bluehost there comes a FREE domain name with the hosting!!! Seriously this will save you so much energy! I love it!
- You will be able to create a money generating blog from having a properly setup domain name and hosting service. And at a price of only $3.95, you will be able to pay back the money you spend on that very quickly!
- There are several different hosting plans you can sign up to. I highly recommend signing up for the 12-month plan. If you want to save more money you can even sign up for the 36-month plan where you pay less overall.
- If you intend to monetize your Blog, you will need to be self-hosted. You can kick-start your business and appear super professional to your readers and potential business partners by choosing Bluehost!
These are only a few things I love about Bluehost.
So, if you are planning to build a successful blog and in the future generate an income from selling your products, creating a thriving online business or selling your consulting work (just examples), then paying for self-hosting and your domain name are a must. If you are still unconvinced how easy it really is to “Create your own WordPress Blog on Bluehost”, go ahead and jump right into watching the step by step tutorial I filmed for you guys. I set up my Blog in just +/- 7 minutes and I talk in that video…A LOT!
CLICK HERE TO CREATE A BLOG Or go ahead and read the step by step instructions on how to create a blog on Bluehost down below:
How to create a blog for WordPress on Bluehost:
1. Create your free domain name
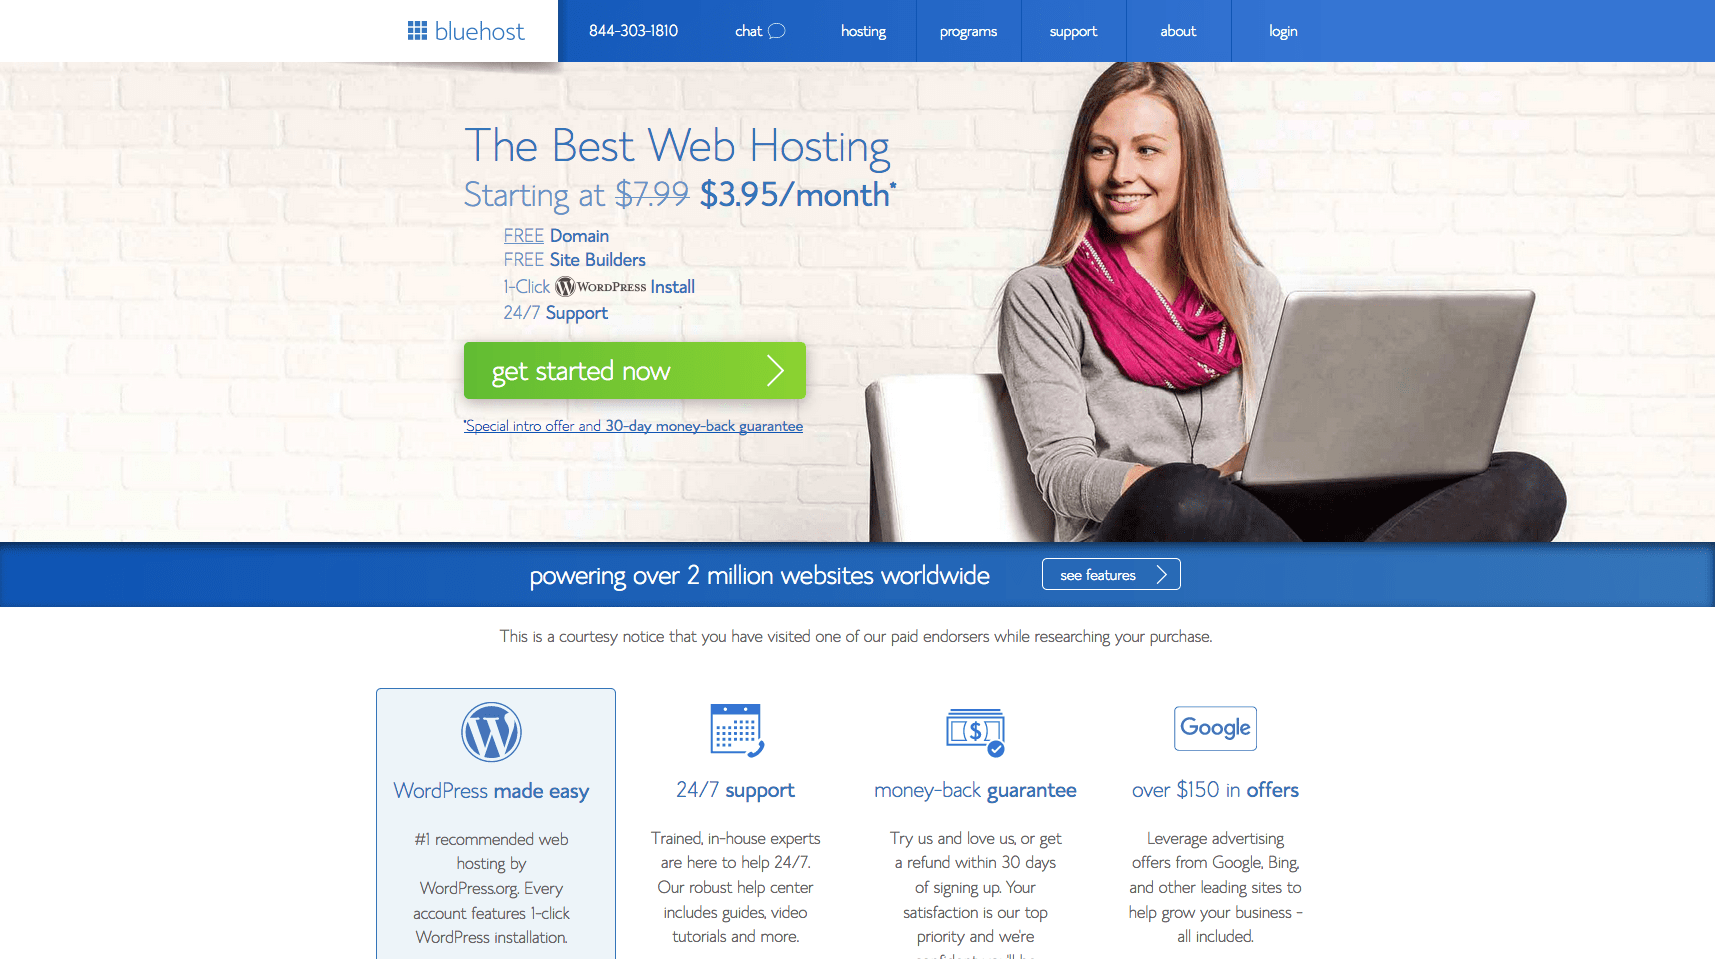
You can click here to get started with your free domain name and continue with my step by step guide on how to create your blog below.
- Click the “get started” button
- Choose your plan (you can change that later if you like)
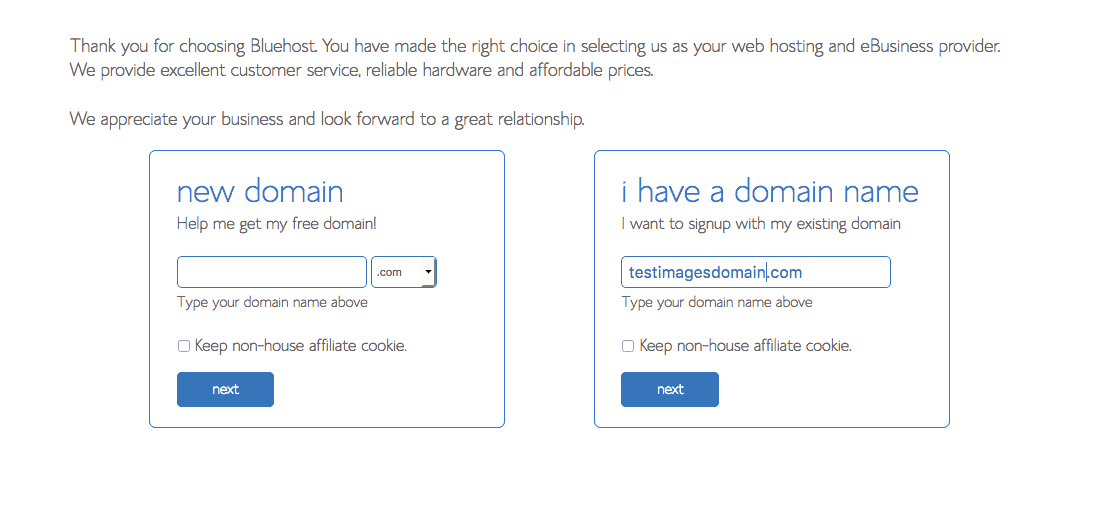
- Create “New Domain” or register an “Existing Domain”
- Click Next and Check if your New Domain is available – if not you might choose .net or another version or someone already uses that domain and you will need to adjust your Blog name
- Enter your Account Information
 Here a few additional thoughts on that first Step. Before you even want to think about running a Blog, creating Blog Posts and making money, you need to think about what your Blog will be all about. Before you continue with how to create your blog think about: What am I writing about? Do I create a Niche or Lifestyle Blog? Do I want to be a hobby blogger or am I intending to make a living out of this? What Blog name do I choose?!!! You need to think about a few things in advanced that will be crucial for the future success and monetization of your blog. If you got this covered head over to Bluehost and continue with my step by step guide on “How to create a Blog”. Also, here are some posts which might help you after you created your blog:
- Blog Recommendations – use my resource page to profit from the tools I love and used to grow my blog
- How to use Tailwind to skyrocket your Blog Traffic
- The 9 Most Popular Blog Themes Ever! + List of 12 unique Niche ideas nobody has blogged about before!
- How to create your unique Blog Niche Idea
- How to create a successful Blog on your first Attempt + Free Step by Step Guide
2. Choose host for your Blog
- Select hosting Plan
- Choose/unchoose additional service
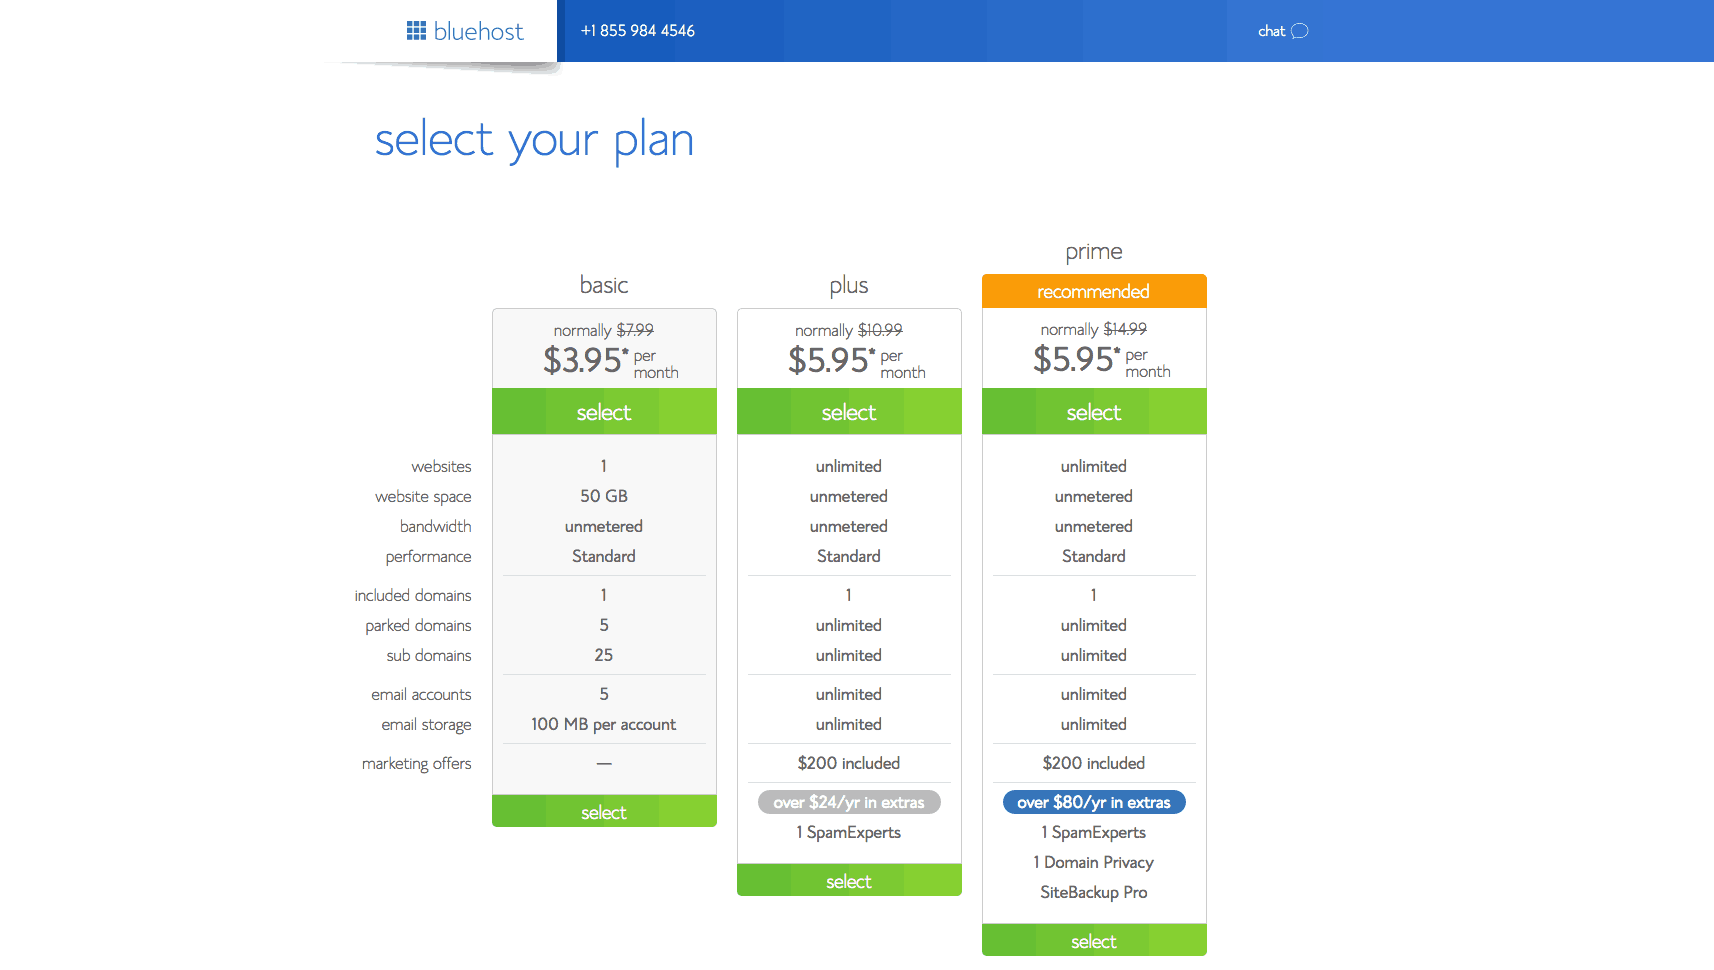 Now that you have decided on the name of your blog you can choose your hosting plan. As seen it the very first step of this guide Bluehost offers several different hosting plans and I quickly want to touch upon the finance of it all:
- I suggest you start with the basic plan. It contains all you need. Especially, if you are a beginner.
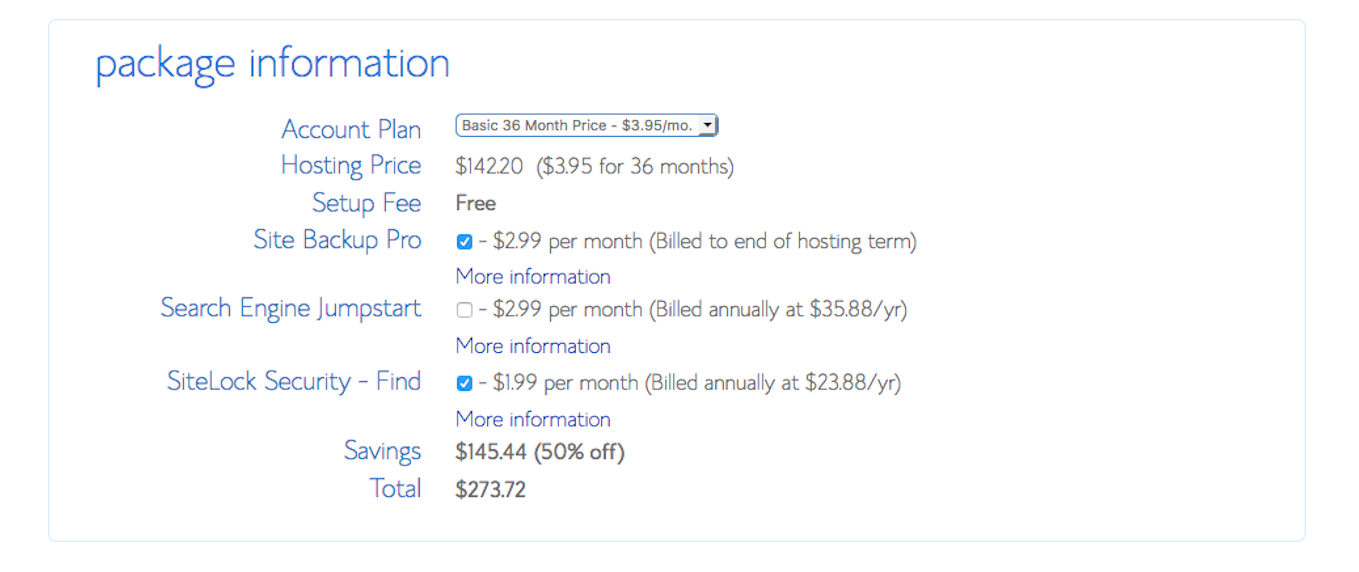
- After choosing your account plan, the price of your plan will vary for hosting your blog on Bluehost depending on the timeframe you select. Therefore, the longer you commit to Bluehost hosting the cheaper it will get for you overall (12 months = $5.45/mo. > 36 months $3.95/mo.). However, I think its completely understandable that you may just want to try out Bluehost and if you like it you can increase the timeframe at any later point in time.
- Bluehost provides additional services that you can include in your hosting package e.g. Domain Privacy Protection, a Search Engine Jumpstart or SiteLock security. To be transparent I would suggest: If you have the funds go for it, especially things like Search Engine optimizing can be crucial for your blog’s traffic and monetization strategy. However, if you are just a beginner Blogger, this is not necessary right from the begging. Bluehost lets you add these extra services at any point in time after registration.
- Worth mentioning as a final point. If you ever decide to cancel your subscription with Bluehost, they will refund you the remaining unused month you already paid for (you will have to pay upfront for the plan you select). I believe that super fair.
3. Set your Password & install WordPress on Bluehost
- Choose a Password
- Agree to Privacy Policy & Terms of Service
- Login to Bluehost
- Select a Theme / Skip selection
- Start building a Blog on WordPress
After you have chosen a password, Bluehost will connect you to your Bluehost account. If you like you can now pick a Theme for your Blog. Otherwise, you can skip this step for now. I would recommend to use the preinstalled basic WP theme and focus on that later when you are more experienced with the interface. If you click on “Start Building” it will transfer you to WordPress. Let me give you a quick rundown of the difference between Bluehost and WordPress.
- Bluehost is your hosting platform
- Hosting
- Domain Name
- WordPress is where you manage your Blog
- create Blog Post
- pick a Theme
- install Plugins
- manage your Comments
- change your Blog’s appearance
- …
- …
You will be spending only a little time on Bluehost after setting it up. WordPress will be your main blog management tool. Let me know if you have additional questions on this.
WELL DONE! YOU DID IT! You completed all essential first steps in how to create a blog!
4. Going Live – Launch your Blog
Quick side info: if you click on visit site out of your WordPress login page your blog appears live! It is not, however. When you log out and type in your newly created domain name into your browser, a landing page will appear saying your blog is in progress “coming soon”. Don’t panic this is great. Basically, this means you can work on your blog design, blog posts and really get to know WordPress BEFORE everyone sees your blog. Imaging someone clicking on your site and on the next day everything looks completely different or your posted something by mistake. Take your time to really get to know WordPress until you go live with your Blog.
- Choose your Theme
- Create your Brand (Font, Color scheme etc.)
- Develop a few signature Posts and publish them
- Get to know WordPress
- Go live – LAUNCH (Menu<Bluehost<Home<Launch)
AMAZING!!! YOU DID IT! YOU JUST STARTED YOUR BLOG & THE FIRST STEP IN CREATING A SUCCESSFUL BUSINESS!
Follow Up – How to create a Blog!
I am currently in the process of filming & editing a video explaining to you how to use the WP Platform including how to create posts add categories, add plugins etc. The video will be accessible here as soon as released.
In the meantime, if you are looking for essential Blogging tools, I would suggest you check out my Recommendation site click here or navigate to the top of the page in my drop-down menu.
[social_warfare buttons=”Facebook,Twitter,Pinterest”]
Here are some additional blogging-related posts you could be interested in after you have learned how to create a blog using setting up your WordPress Blog with Bluehost
Blog Recommendations – use my resource page to profit from the tools I love and used to grow my blog
How to use Tailwind to skyrocket your Blog Traffic
https://whatskatieupto.com//2017/11/28/use-tailwind-skyrocket-blog-traffic/
The 9 Most Popular Blog Themes Ever! + List of 12 unique Niche ideas nobody has blogged about before!
https://whatskatieupto.com//2017/11/07/9-popular-blog-themes-ever/
How to create your unique Blog Niche Idea
https://whatskatieupto.com//2017/11/17/create-unique-blog-niche-idea/
How to create a successful Blog on your first Attempt + Free Step by Step Guide
https://whatskatieupto.com//2017/11/16/create-successful-blog-1st-attempt/
Do you have any questions or remarks?
