Do you want to learn an easy way how to post on Pinterest? Today, I’m showing you how to upload an image from your computer or your phone to Pinterest to create a Pin.
So there are many ways to create or upload a pin to Pinterest, but today we’re going back to basics. First, I will show you how to post on Pinterest using your laptop and then with your phone.
Plus, how to use the Pinterest + Tailwind Chrome Extensions to post on Pinterest. This tutorial will be super simple and perfect for any beginner starting out with Pinterest.
You’ll have no problem uploading and creating pins for your account yourself.
Are you ready? Ok, let’s do this!
P.S. If you need help designing your Pinterest pins, check out my very own Pinterest Pin Templates here.
My template pack includes 57 different pin templates you can use. I’ve designed them all myself, with the Pinterest best practices in mind so that you get the most clicks over to your site!
So check out my Templates by clicking here.
Pinterest Account Overview
Ok, please log into your Pinterest account.
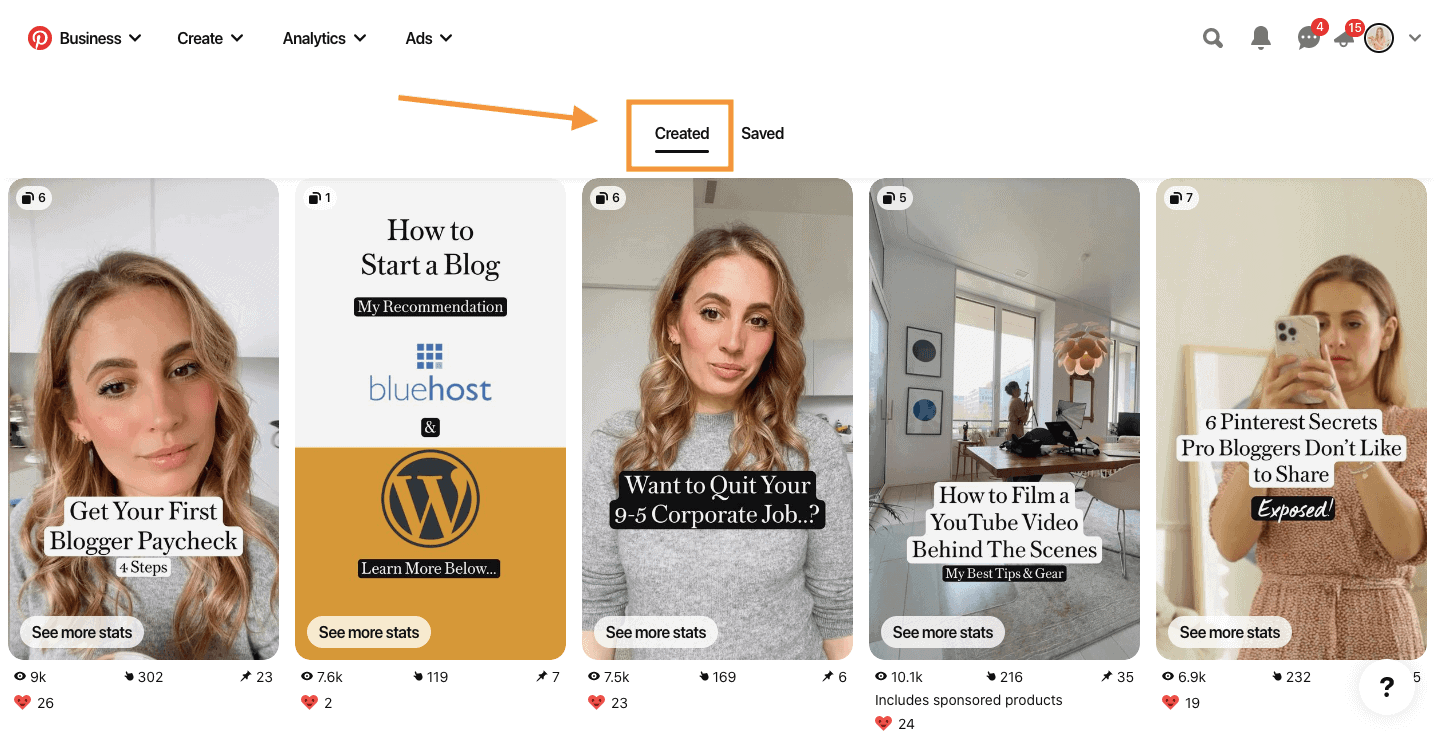
Just to give you a quick overview of a Pinterest profile, in the “Created” tab, you can see all the pins you upload in chronological order.
Next, in the “Saved” tab, you can see all the boards you created. I’ve got a whole video on how to do that so that you can watch that too. Boards are like folders on your computer. They help you organize your pins.
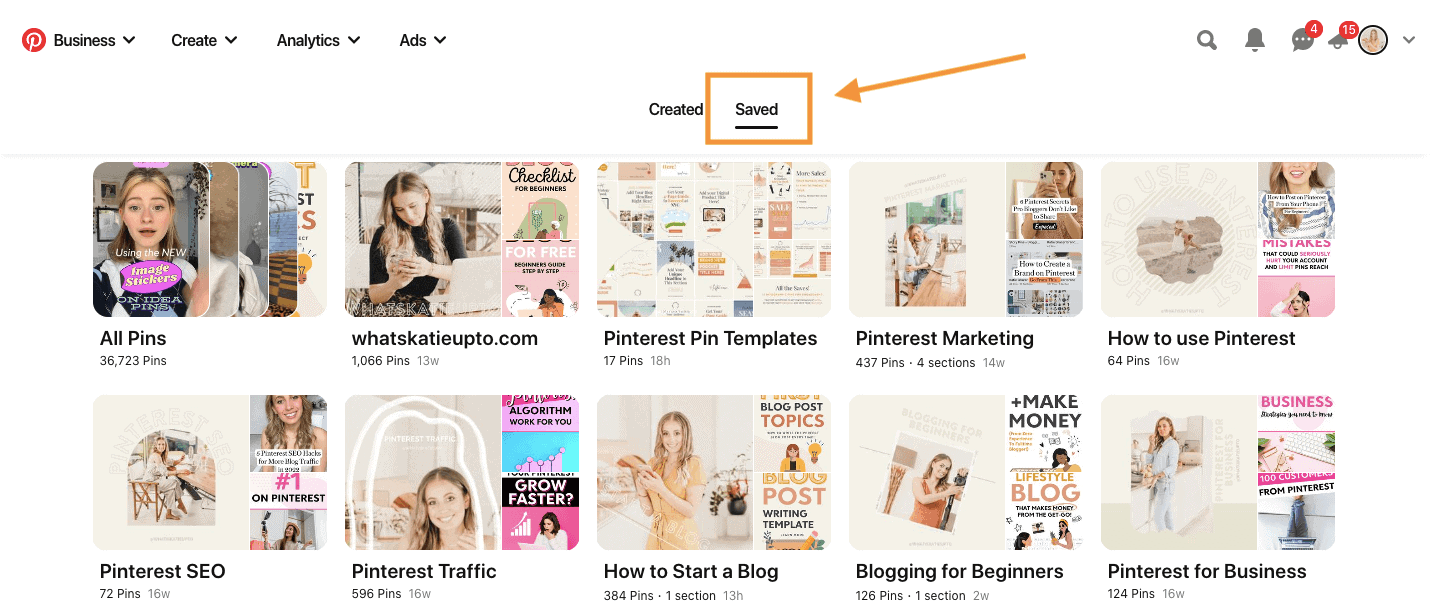
Each pin you upload to Pinterest has to live on at least one of your boards. You can also pin a pin to several boards, but now we’re getting ahead of the game. Just remember each pin needs to be pinned to a board.
How to Post on Pinterest from Desktop
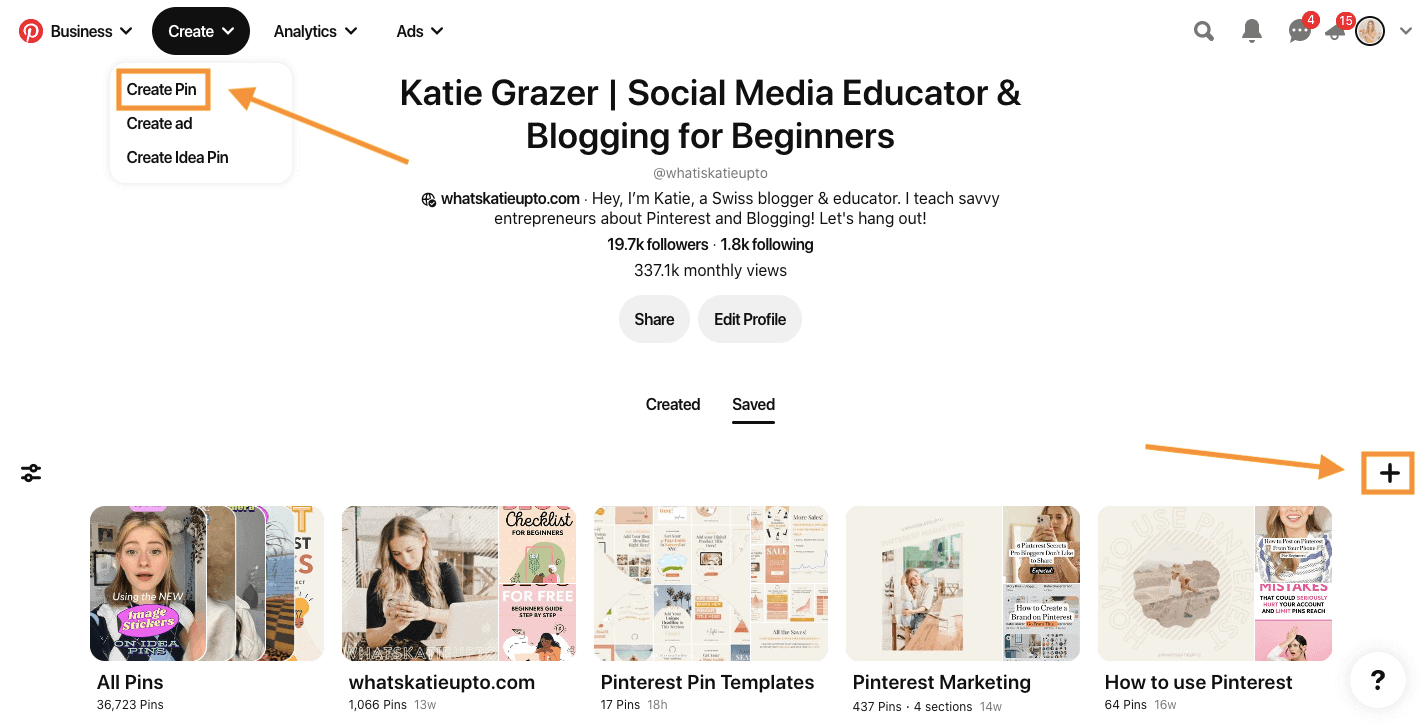
Ok, so to create Create a Pin on desktop, you can either click on the top and click create “Create Pin”.
Or press the plus sign here and choose pin.
How to Upload Pin Image or Video
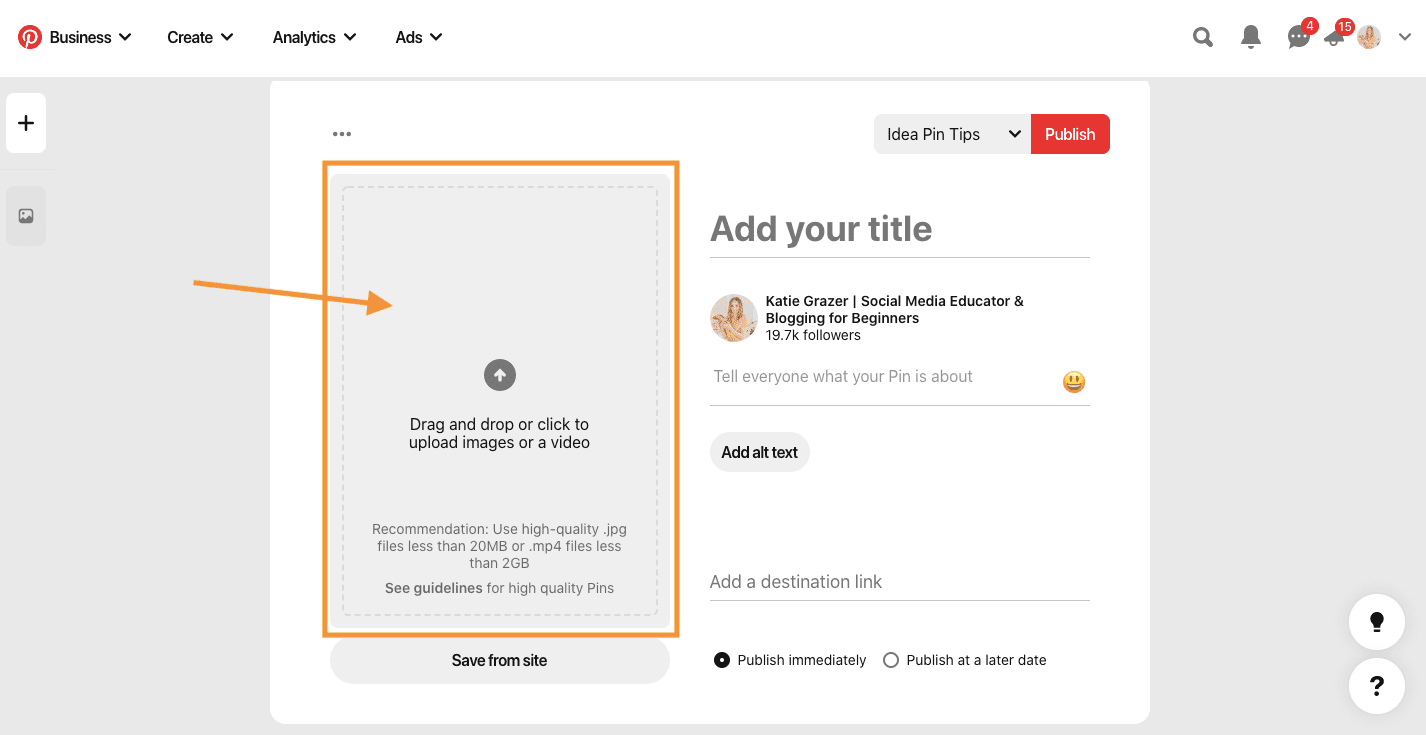
Now here is the editor where you can upload your pins. To add an image, simply Drag and drop it into the field.
How to Upload multiple pins
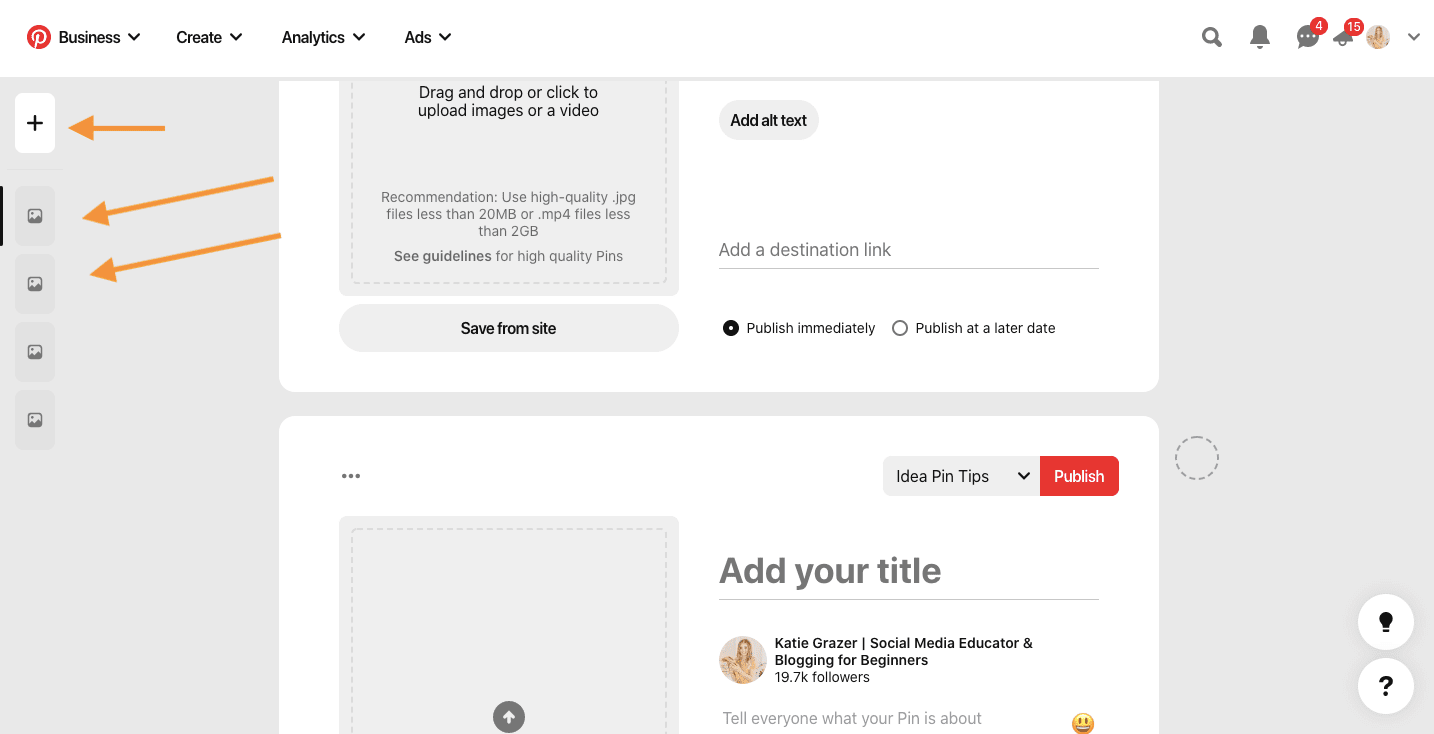
If you want to work and upload more than one pin at a time, you can do that too, simply press the plus sign here on the left and then upload your other pins.. As you can see, it’s the same uploading process for video and images. You can work on up to 15 pins at the same time.
Add a destination link
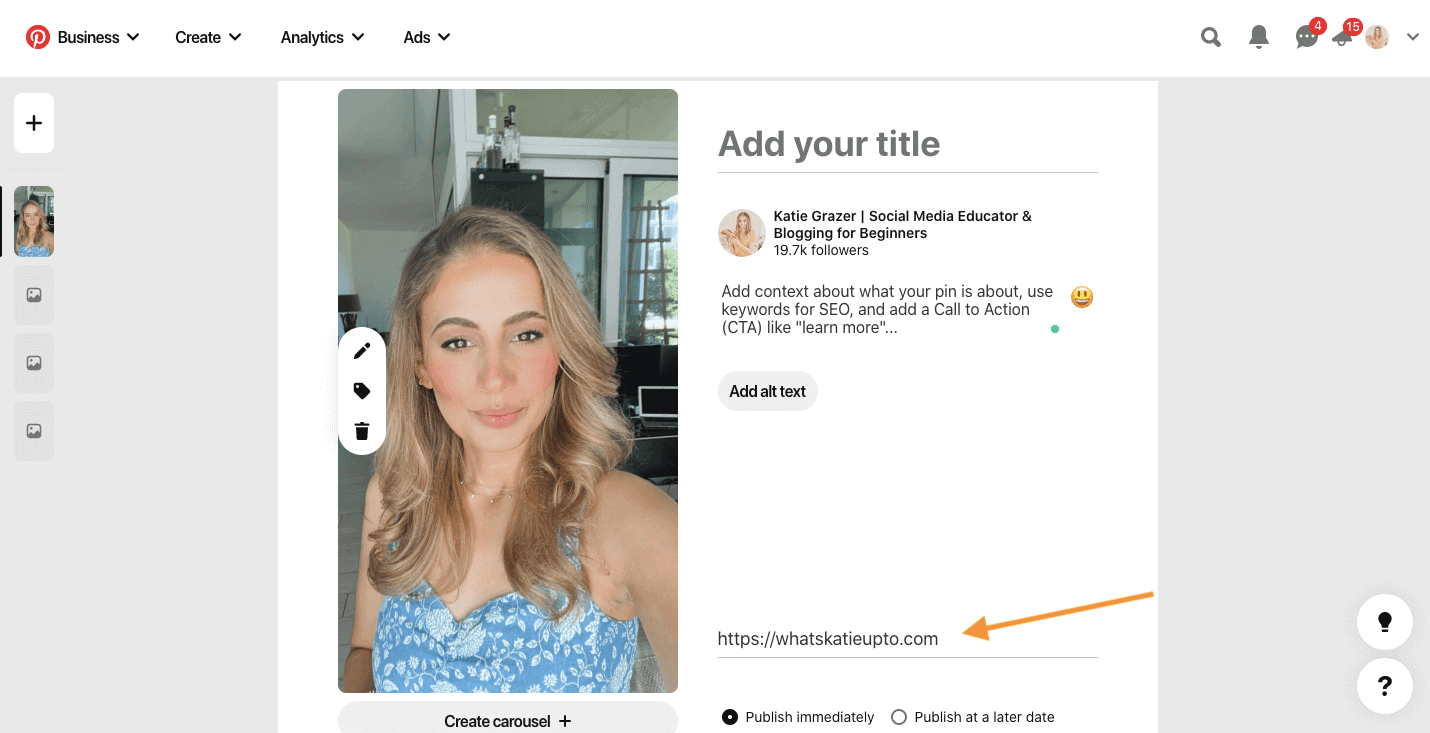
Now you can choose where this pin will lead people. This could be your blog or website, your shop, your youtube, or Instagram. It’s really up to you. So what you want to do first is add your URL so that people should go when they click that link.
Add Pin Title, Description + Alt Text
Ok, you’re doing great.
Now we need to help Pinterest understand what this pin is all about. Pinterest can actually read the text on your pin and understand what the image on it is all about, but we still want to give Pinterest more information on what it’s all about, so always add a title and a description to your pin.
This is so important for Pinterest SEO so that when someone searches for a keyword, for example, your pins show up as a result.
Ok, so add a title and a pin description.
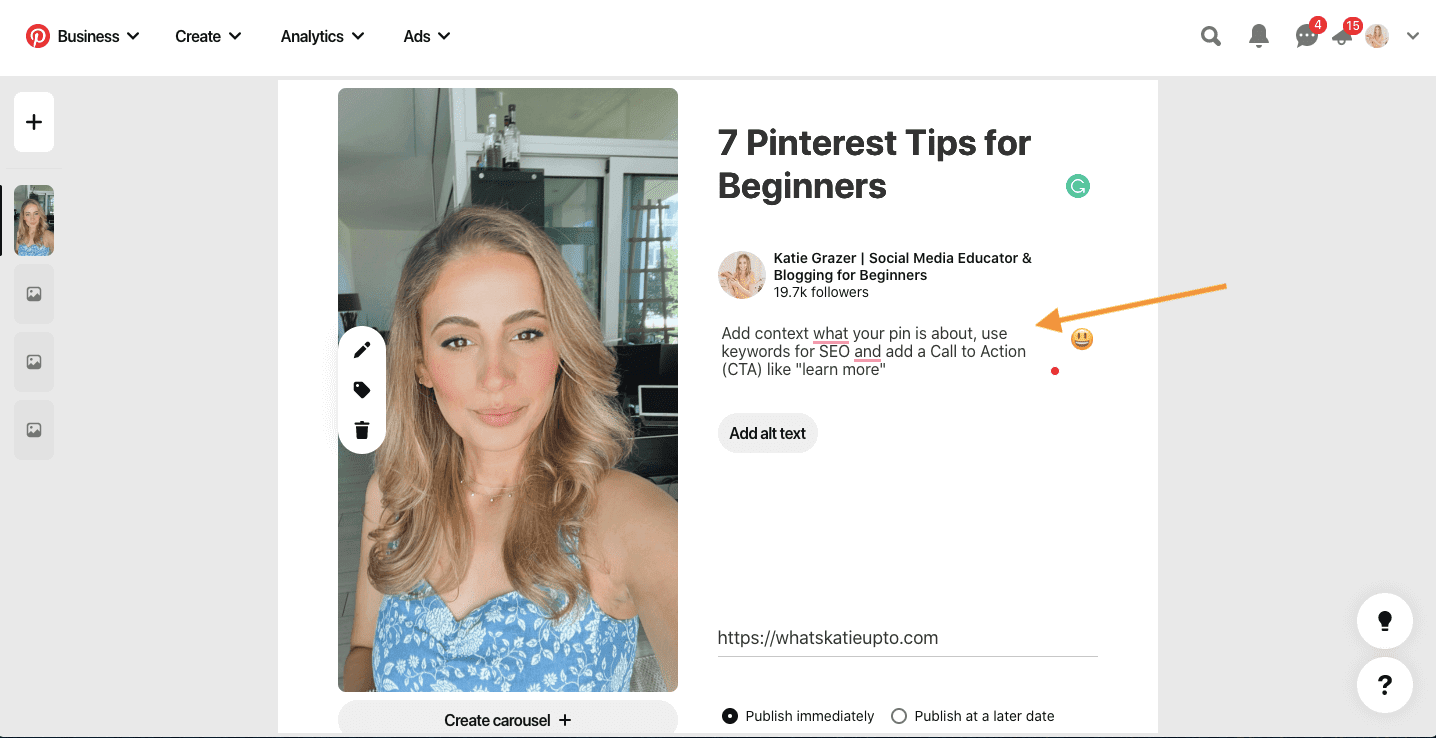
The description should just be a short description of what people can expect from your post or video. And make sure to include relevant keywords here and in the title.
Alt text, as far as we know, isn’t relevant for the algorithm right now. But it helps people with visual impairment explain what they can see on the pin.
Pin Editor
Now, on the left, you can see the editing option for that pin.
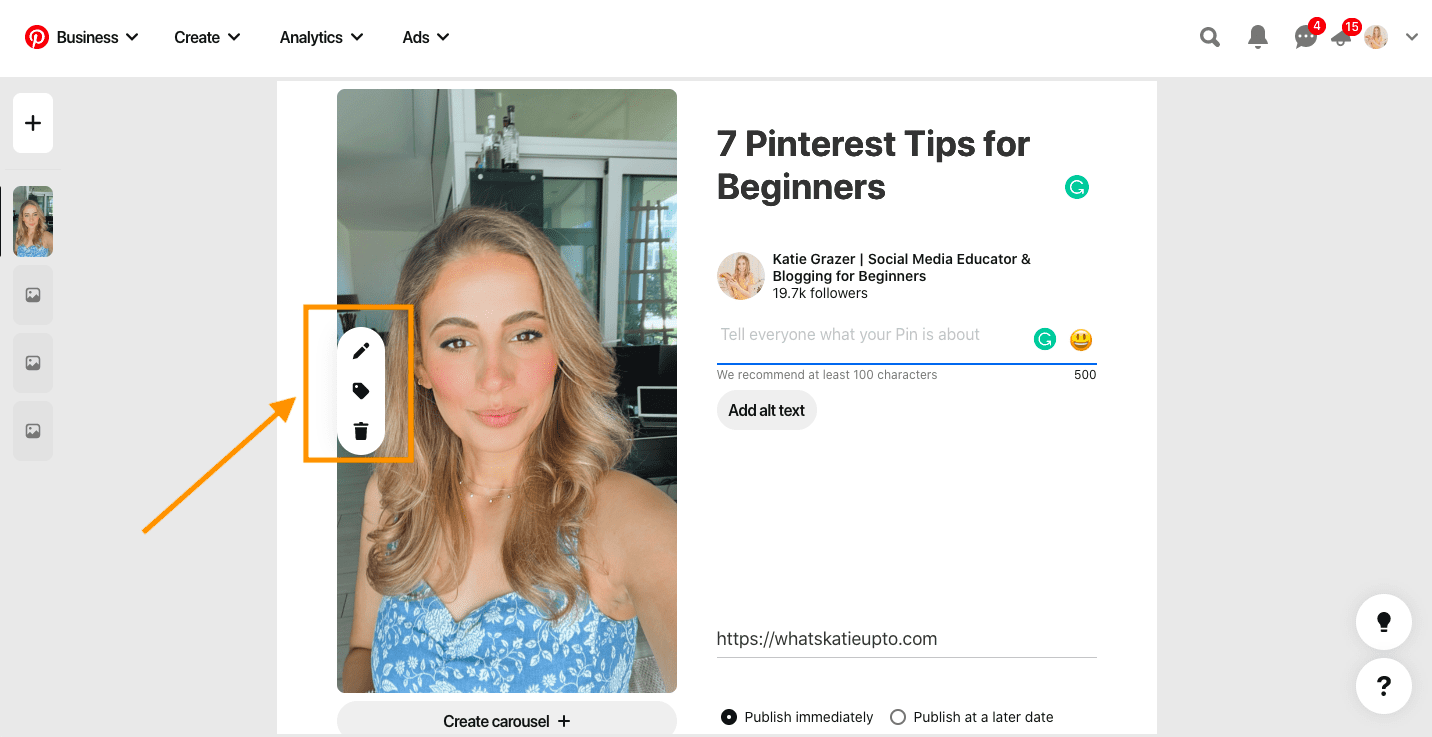
First, you can click the little pen icon, and that opens the Pinterest pin editor. Here you could add additional text to your pin or make other changes. The truth is I never use this.
There are way more advanced free editing software out there like Canva, which I’ll link you in the description, that makes it super easy to create beautiful graphics like this, so you don’t need to use this tool here, but again you could if you wanted to make last-minute changes.
How to Tag Product in Pin
Next, we have the tagging tool just below the pin icon, and this is super exciting.
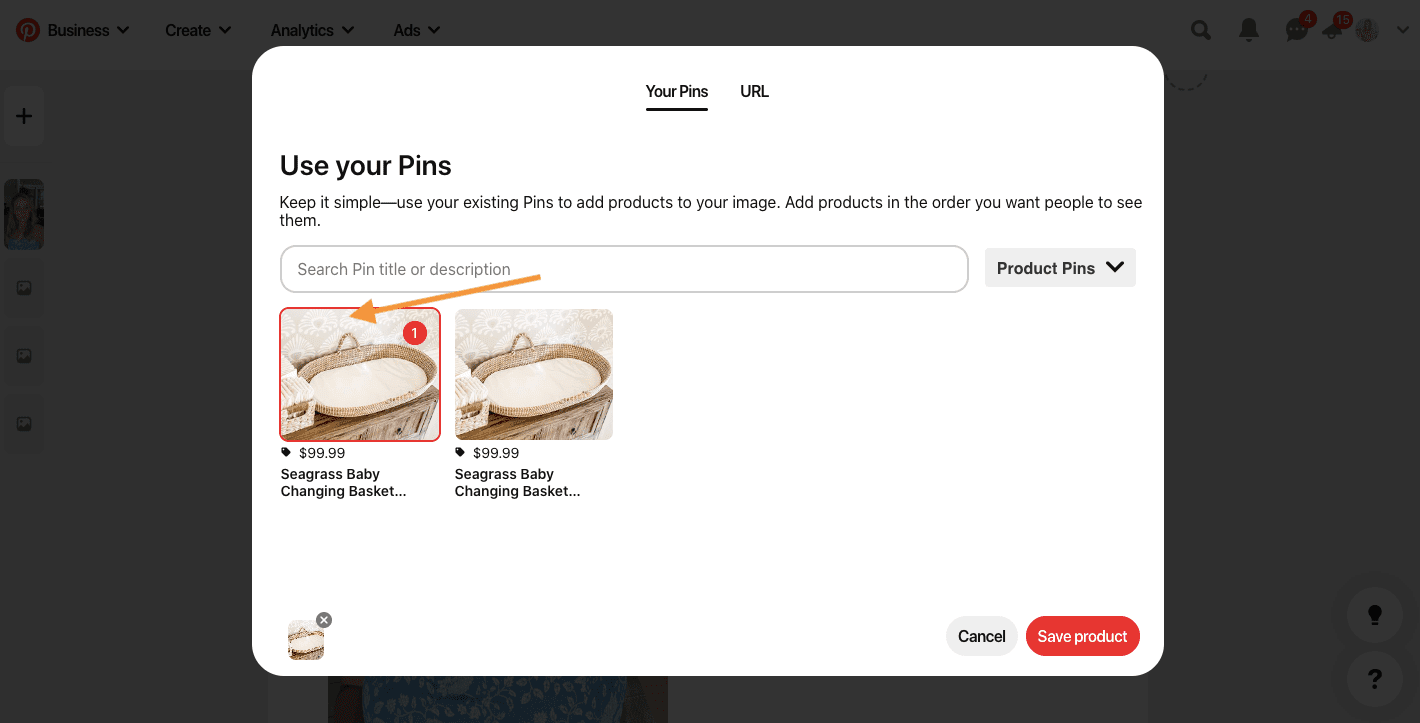
If you own an eCommerce store, you can tag relevant products for that pin here. So, for example, if we have a gift guide pin here, we can tag this guide with relevant product pins from our Pinterest account.
You can search your existing product pins on Pinterest and tag them here. Now, this is a more advanced strategy I’m planning on making a video about soon so let me know in the comments if that’s something you want to learn more about.
Delete a Pin
And third, you can also use the little trash icon to delete the pin.
Ok, we are nearly there. Well done so far.
How to upload a Pin
Now you can either publish your pin image immediately or you can also use Pinterest’s own scheduling tool to save your pin at a later time.
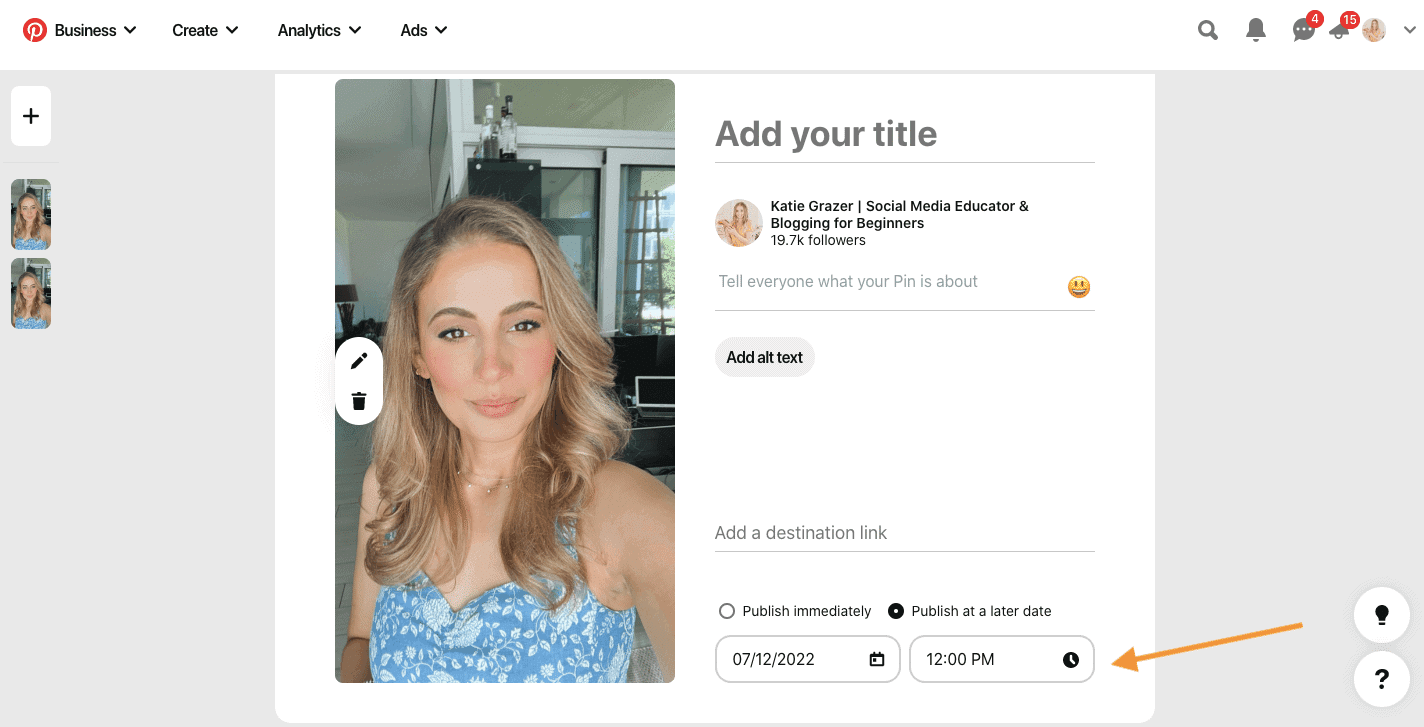
The time is set to your time to whatever you have in your Pinterest setting and computer. So, for example, I’m in Switzerland, but most of my audience is from the US, so I do factor in when I post when my audience is live.
Select a Pinterest Board
Once you’ve chosen when to post, we must decide where this pin will live on your account. And this should be on one of your boards. As I mentioned in the beginning, Boards are like a folder you can use to organize your pins.
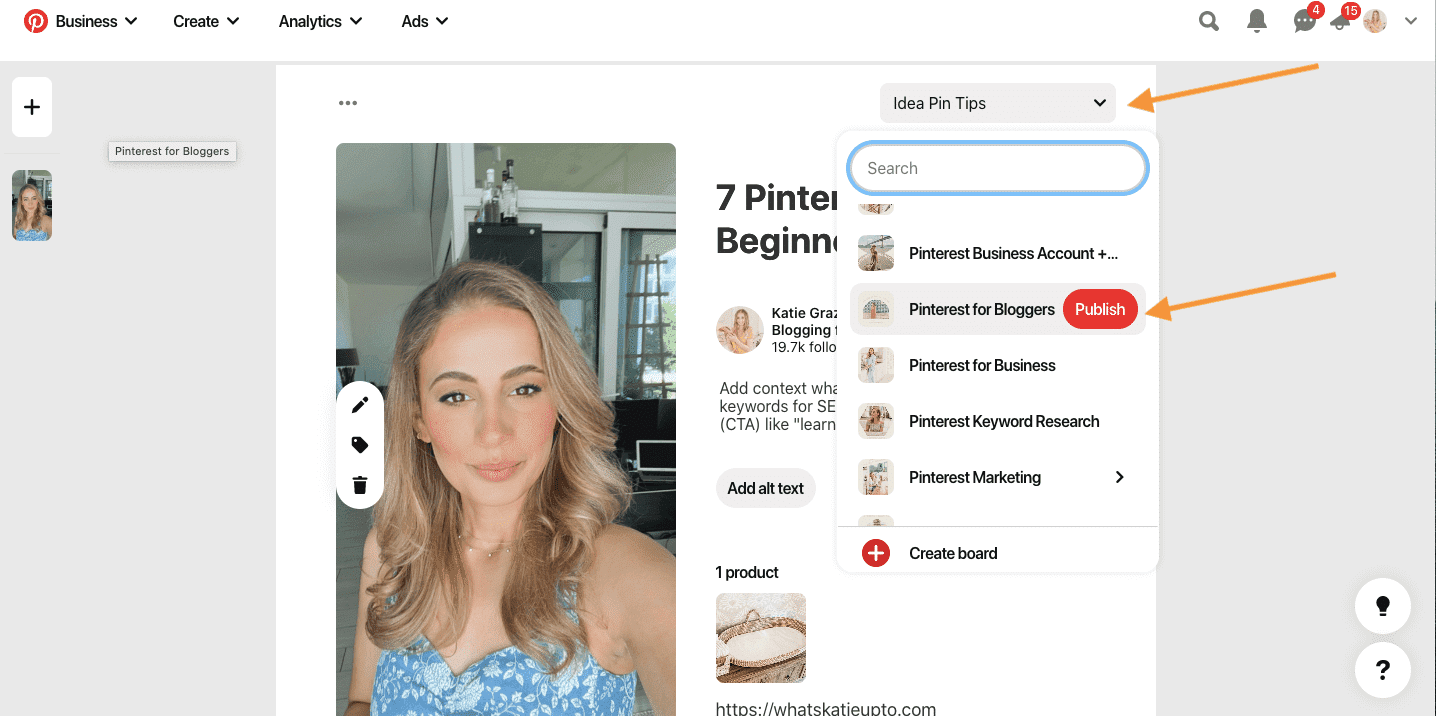
So you should have a board for all the major categories you talk about on your blog, shop, or social so that you always have a relevant board to which you can pin your pin.
If none of the boards you created fits what the pin is all about, it’s a good idea to create a new board and then add the pin.
So either select a board now that you’ve already created; if you got many boards, you can use the search function to find a relevant one or create a new one and then press “Publish” this will upload your pin to your board and make it live for your followers to see.
See Your Uploaded pins
Let’s have a look at how your uploaded pin looks now.
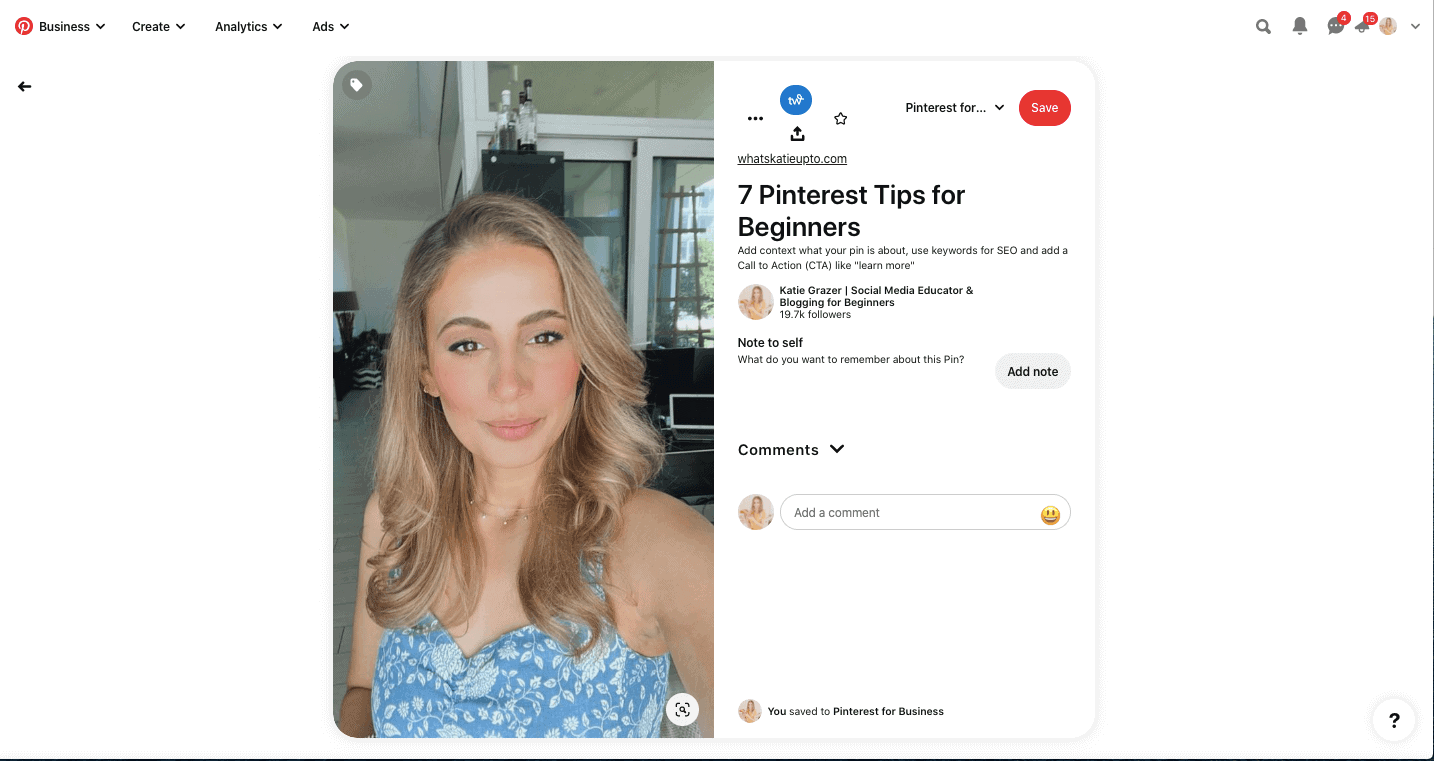
Looking good. You can see it’s saved to the board you selected before and if I click on it, it redirects back to your website.
Awesome job so far.
That’s all you need to know about uploading a pin from the desktop.
Let me switch to my phone quickly and show you how to upload a pin from your phone. It’s very similar, so this is going to be super quick.
How to Post on Pinterest from Mobile
Open the Pinterest app on your device and log into your Pinterest account; make sure you’ve updated the app to the latest version. It might look different for you here.
Upload pin image phone
Ok, now tab the plus + sign in the middle of the screen and select pin.
I’ve got a separate tutorial on creating idea pins but for now, choose a pin to upload a regular image and video pins.
Take a photo and upload it.
You’ve got three options here.
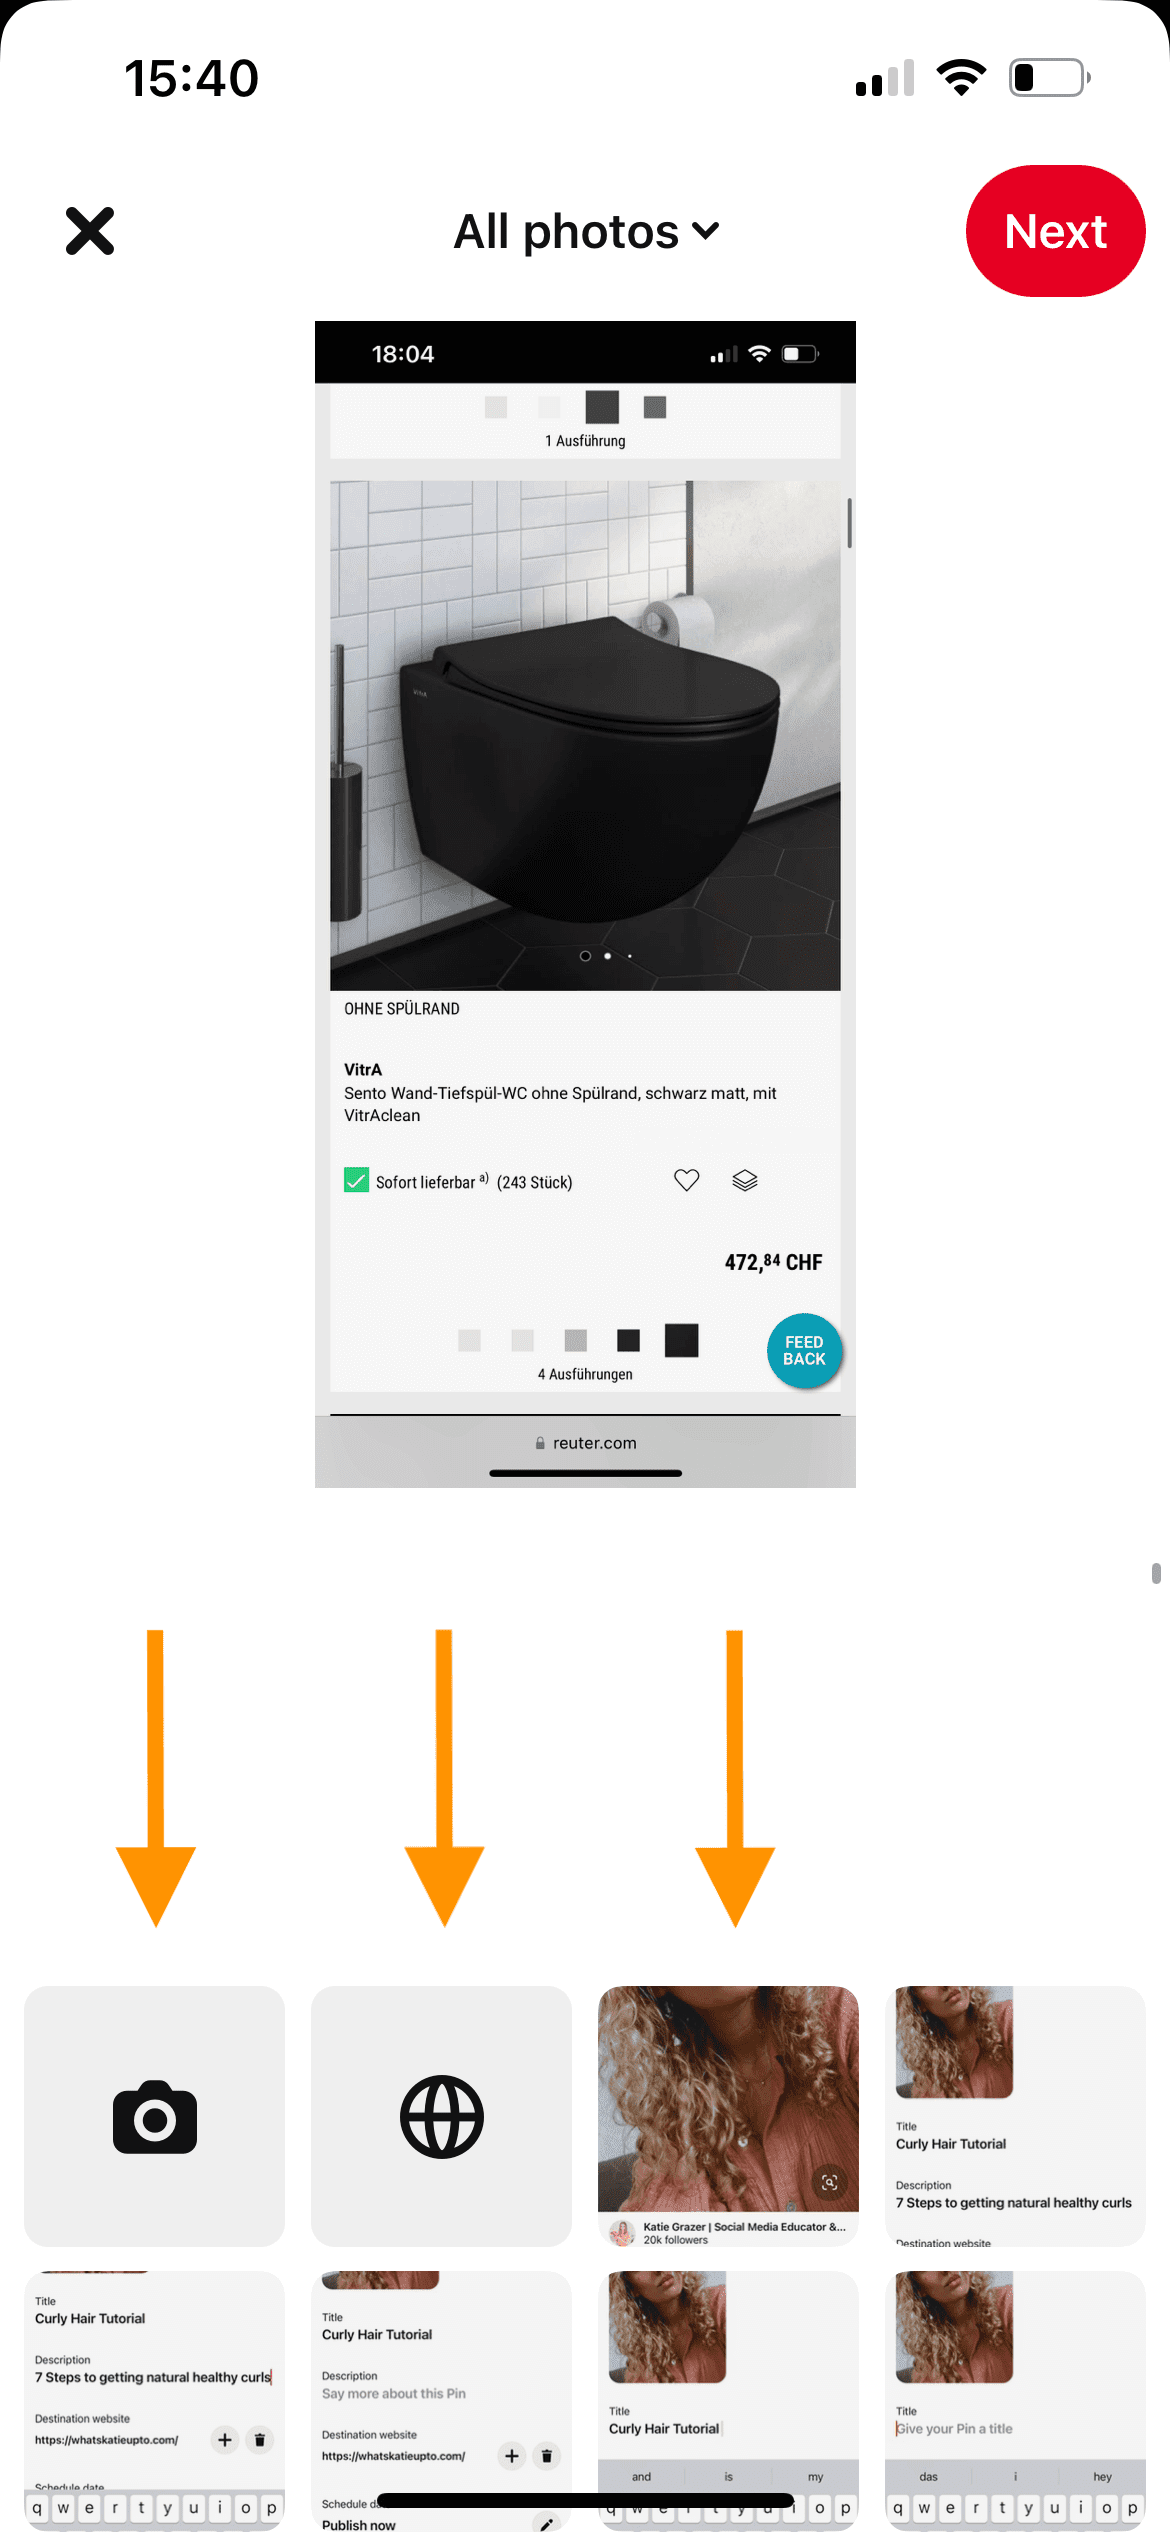
You can either take a photo straight from your phone and upload it. If you get a message that the app doesn’t have access to your camera or contacts, you’ll need to enable access in your iPhone’s privacy settings.
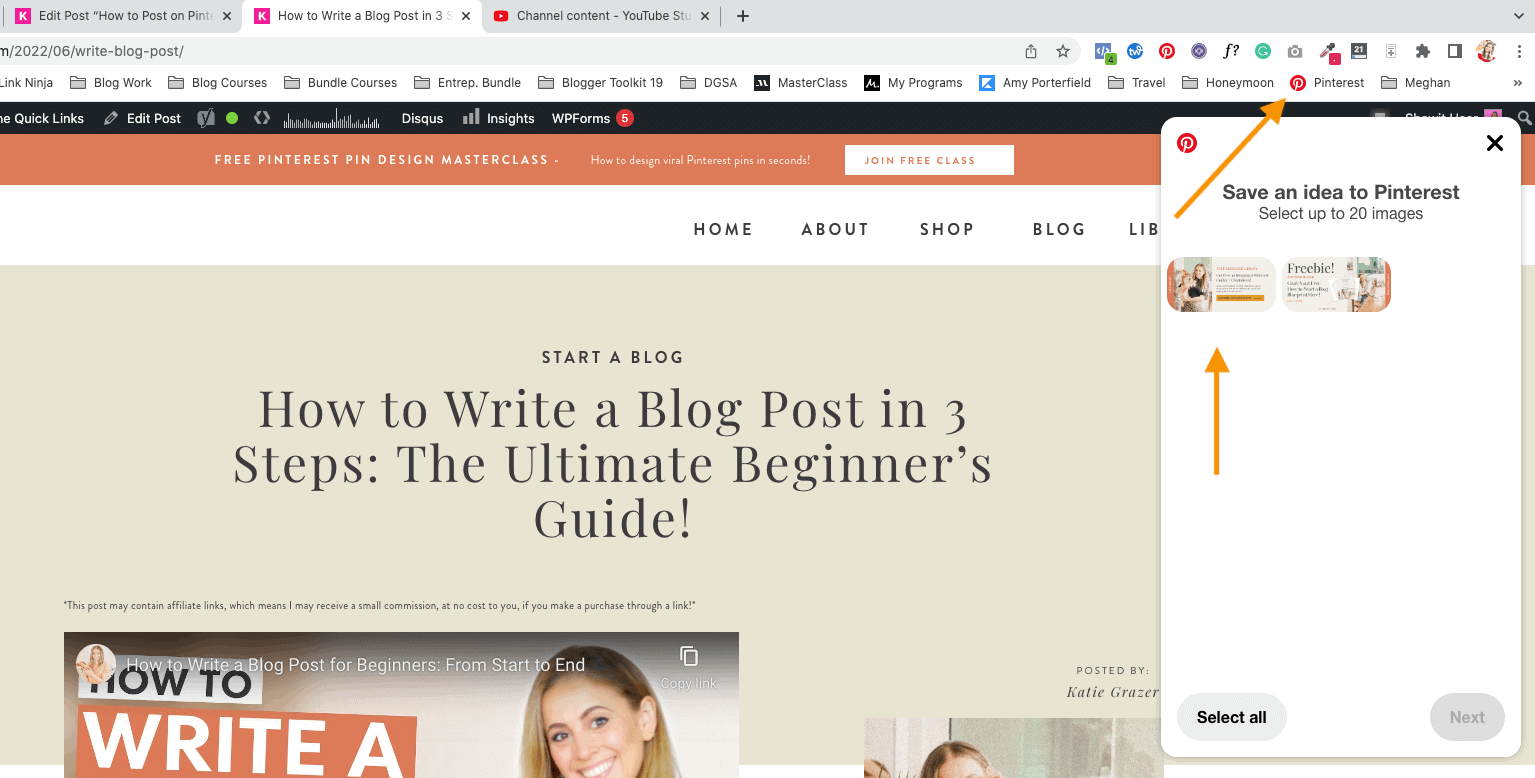
Second, you can also search the internet and, for example, head to your blog, and into a blog post, and then save a pin you embedded in your post. For this, press the red save button, and it shows all the pin images included in that post of yours.
This should also work for your social media and your shop. So if we head, for example, to my Instagram, you can see that I can share my images straight from there too.
If you want to pin several images at the same time, you can select more here. Again press save to move further.
And finally, you can also select an image from your camera roll.
Editor
Ok, again, we are back at this familiar Pinterest editor.
Press the + sign to upload an image from your camera roll.
+
It’s pretty much the same as it is on desktop.
Title and Description
Add a title and a description for that pin.
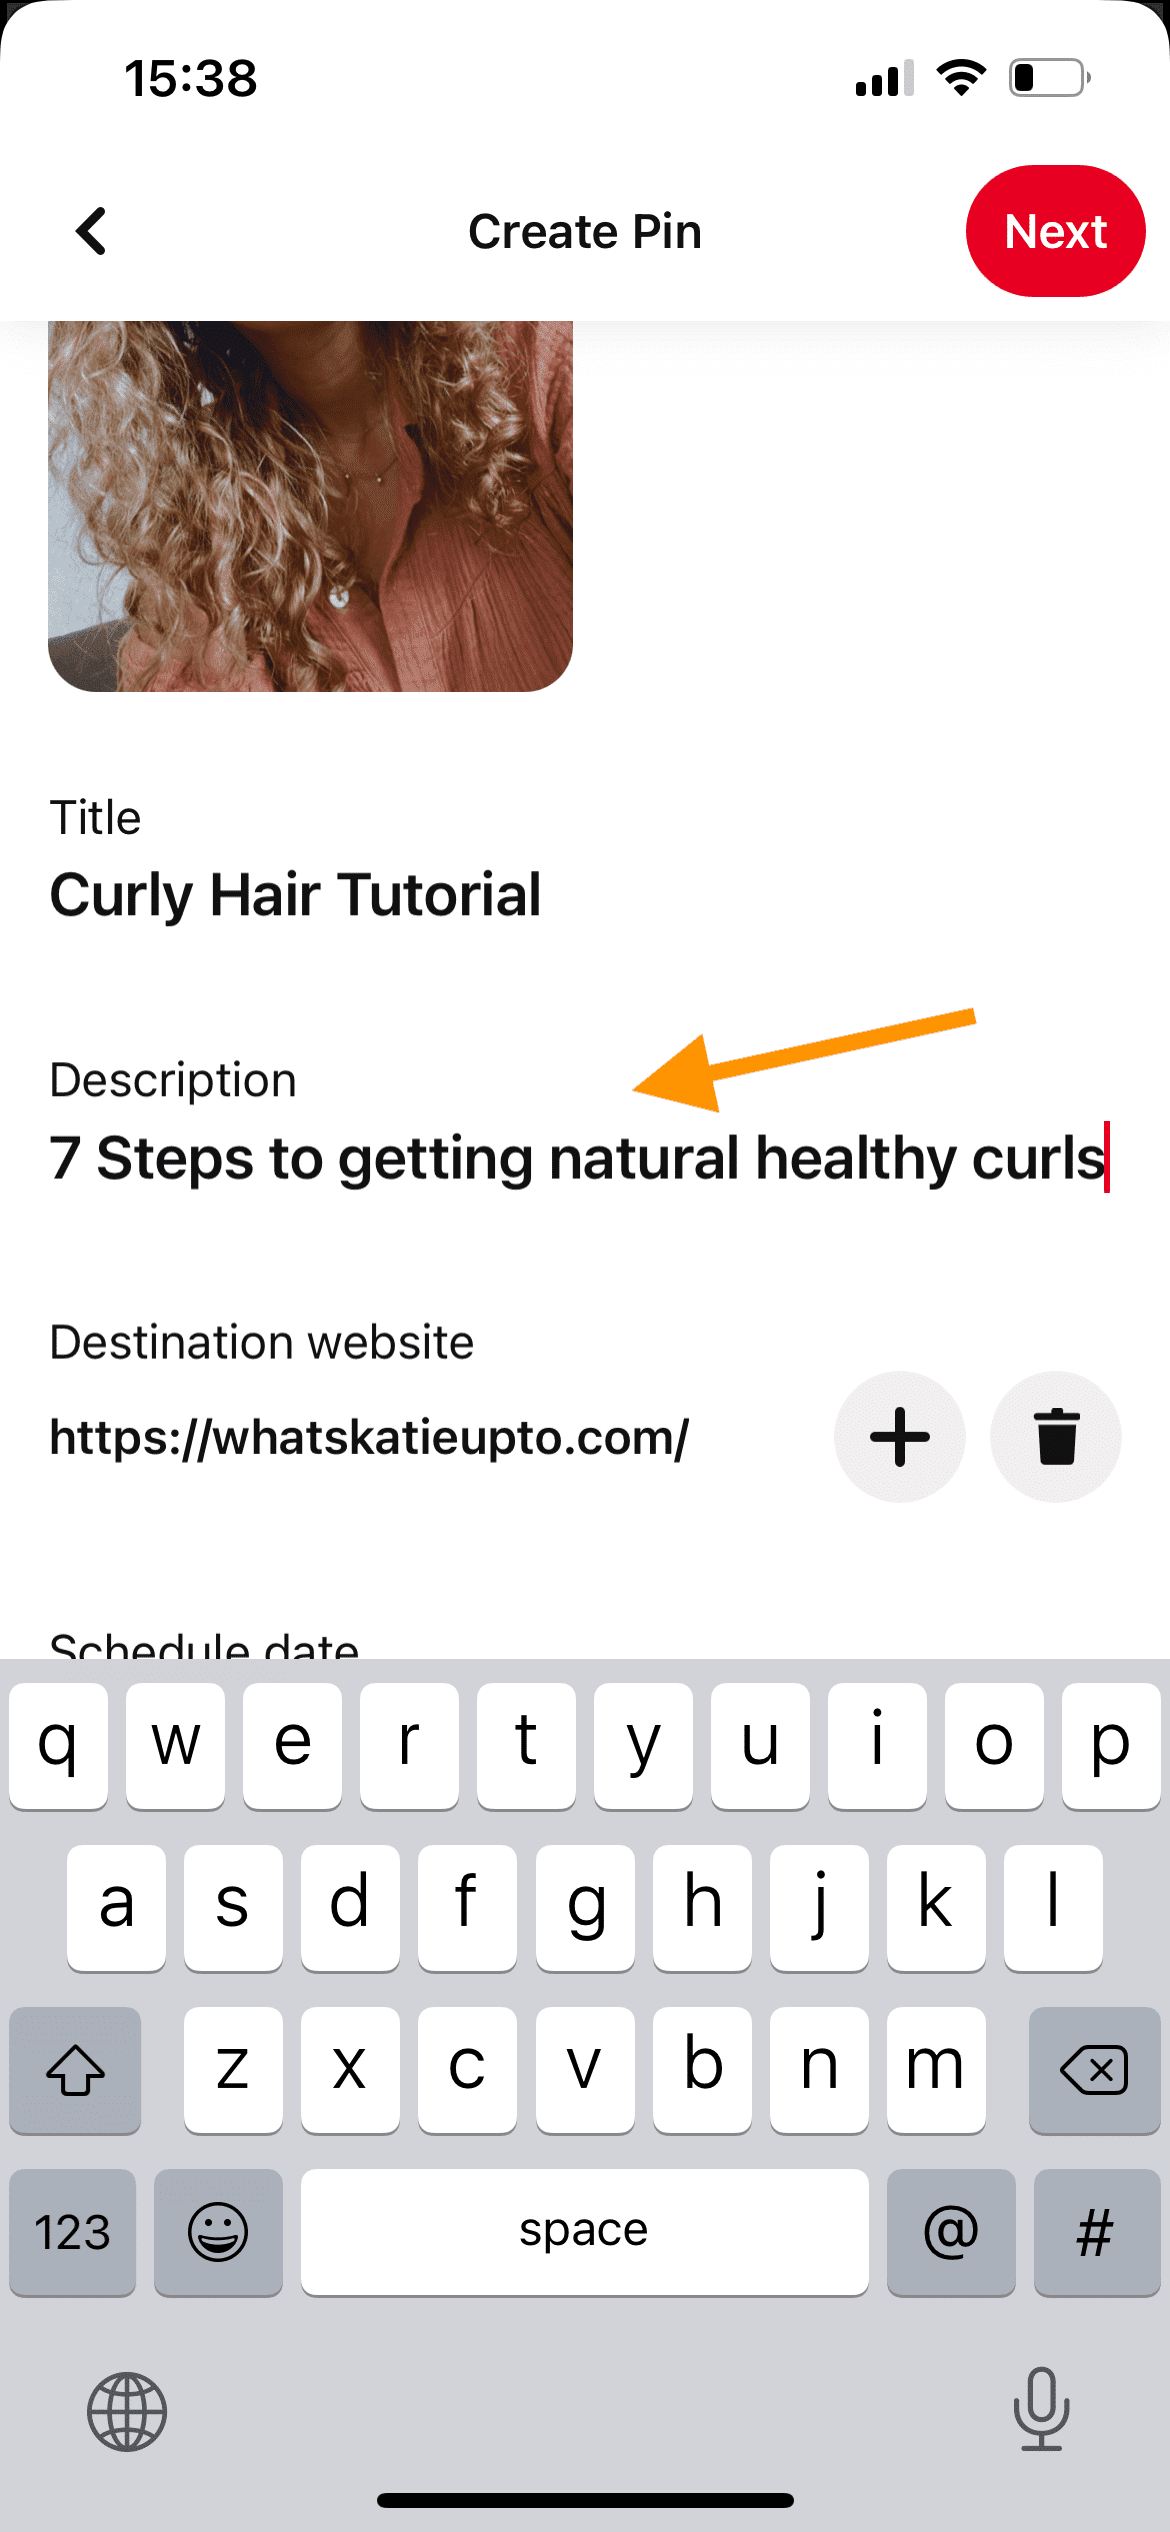
Again this is important for Pinterest SEO and the algorithm.
Then add your destination link. So, where people should go if they click on the pin.
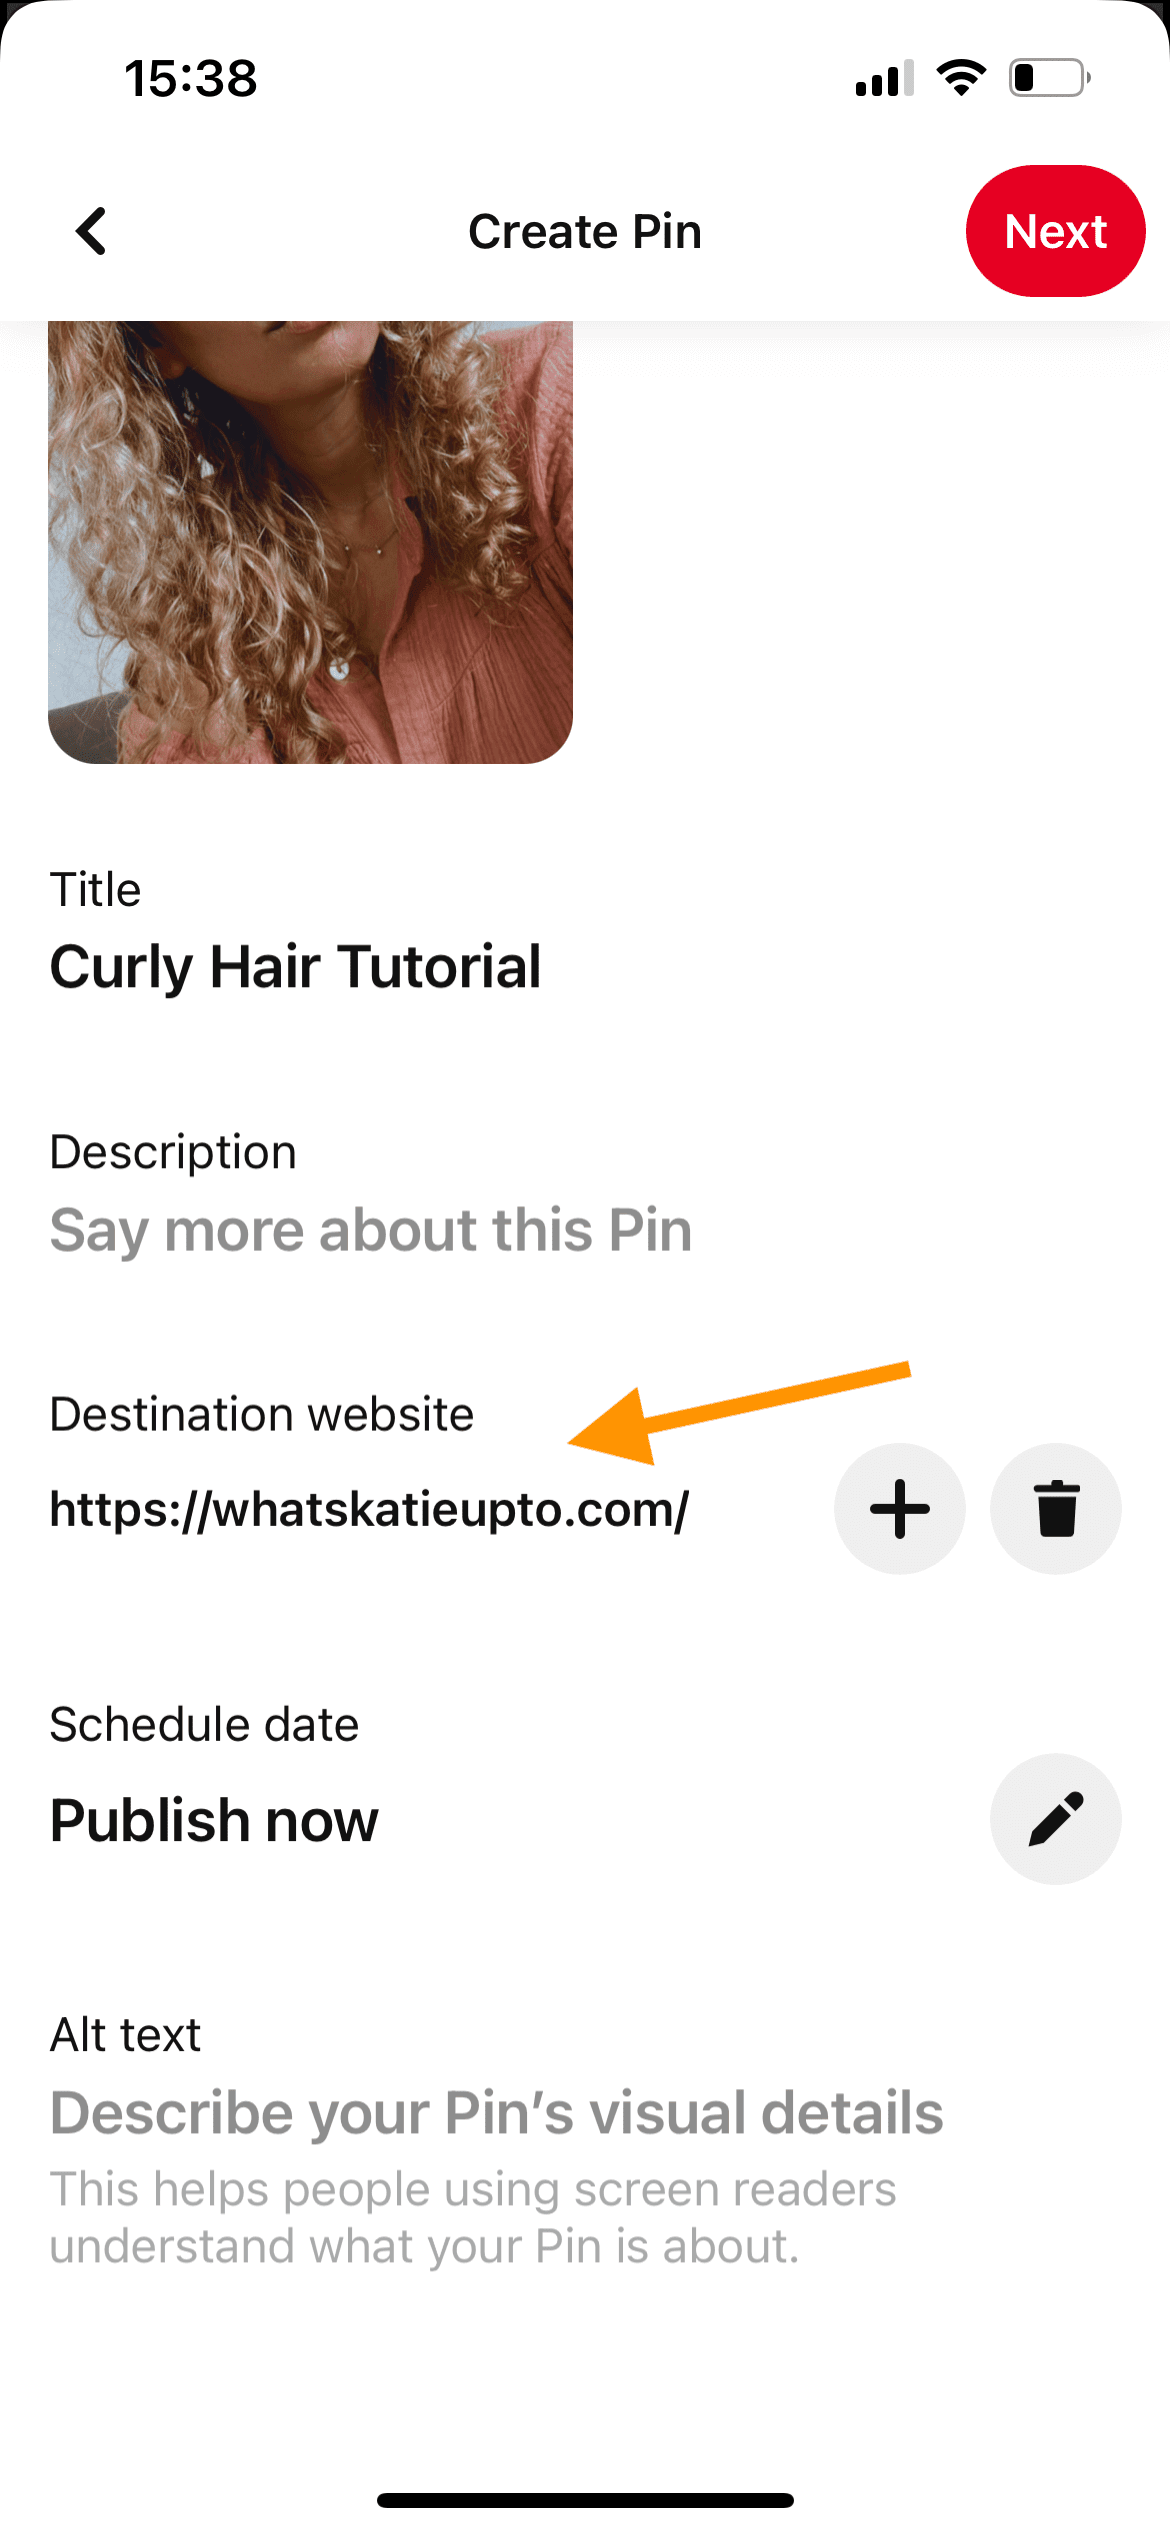
If you pin, for example, multiple pins from Instagram, you don’t need to add the URL, description, or title. Pinterest will source and fill it out with the information straight from social.
But for images you upload from your phone, I’d like you to add the URL and pin information again.
You can again also add alt text to help people using screen readers understand what your pin is all about.
Then, select if you want to save this pin to Pinterest immediately or schedule it for late. If you schedule, it chooses the date and time when your audience is most active on Pinterest, so your pin gets the most engagement.
Then press next.
Choose a board
As before, we now need to choose the most relevant board to that pin. This is where your pin will be stored on your profile. Scroll until you find the board that best fits the pin and press on it, and boom, you’ve just saved it to Pinterest so people can see it.
You can click on the see pin to see how it looks live.
3 Ways to Create Pinterest Pins (Tailwind + Pinterest Chrome Extension)
If you’ve ever wanted to post to Pinterest but didn’t want to leave your current page, or if you use Google Chrome as your main browser, you’re in luck!
The Pinterest Chrome Extension makes it super easy to post new pins and repin others’ pins without ever having to leave the page you’re currently on.
To start, make sure you have both the Pinterest and Tailwind extensions installed in Chrome. You can find them both in the Chrome Web Store.
Once you have both extensions installed, open up the Pinterest extension by clicking on the little red “P” icon in the upper right-hand corner of your browser. You should see a popup that looks like this:
Next, add a description for your pin in the “Description” field.
Then, choose which image you want to use for your pin. You can either click on the “Choose an Image” button to select an image from your computer, or you can scroll through the images on the page and click on the one you want to use.
Once you’ve selected your image, click on the “Pin It” button to post your new pin!
Repin Pins using the Chrome Extension
You can also use the Pinterest extension to repin other people’s pins. To do this, simply hover over the pin that you want to repin and click on the “Repin” button.
You should see a new window pop up that looks like this:
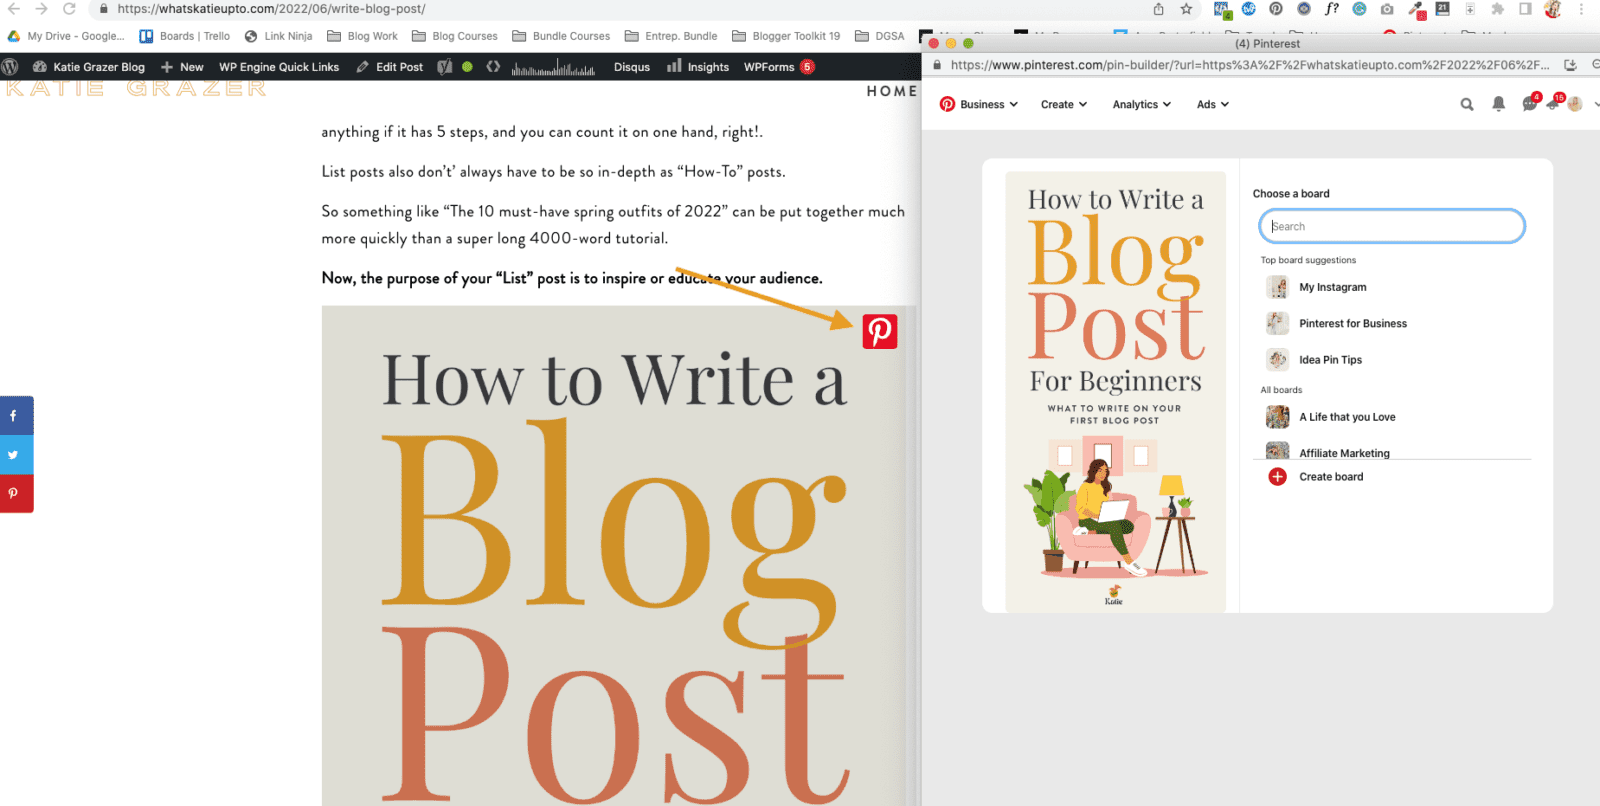
In the “Choose a board” section, select the board that you want to add the pin to.
Then, add a description for your pin in the “Description” field.
Once you’ve filled out both fields, click on the “Pin It” button to repin the pin.
That’s all there is to it! With the Pinterest Chrome Extension, you can easily post new pins and repin other people’s pins without ever having to leave the page you’re currently on.
Well, there you have it! Your complete guide to posting on Pinterest. I hope you found this tutorial helpful and that you are now ready to start sharing your amazing content with the world.
If you have any questions or feedback, make sure to comment down below.
Happy pinning!
P.S. If you need help designing your Pinterest pins, check out my very own Pinterest Pin Templates here.
My template pack includes 57 different pin templates you can use. I’ve designed them all myself, with the Pinterest best practices in mind so that you get the most clicks over to your site!
So check out my Templates by clicking here.


